Same guy- new name - new website!

You will be automatically redirected to the new address. If that does not occur, visit
http://InspiredRemodeling.com/blog
and update your bookmarks. Thanks! -Peter

Wednesday, March 31, 2010

The Beginning of a Marble Bathroom Floor

After adding a bathroom to this home (see these posts) by removing a closet and raising the floor, I had two small stairways to consider finishing. One, in the hall to the den, received pre-finished red oak hardwood flooring (this post). The bathroom, with a set of winding stairs to the back door, would get marble tile.

When I think of marble tile I think of luxury, like a Roman bath from ancient times, right? I guess that was the idea here as well. The homeowner picked out a black marble that had accents of yellowish-green throughout. I always enjoy using stone materials because of the amazing colors and hues that naturally occur in the rock. Most of the time it's covered up with dirt, but now we get to put it in our homes and enjoy it!

Using marble isn't that much different than any other tile, except that the framing does need to be stronger to support the stone material. I had this in mind as I framed the floor so there were no concerns with this on this project.

Stone tiles, like marble, slate, travertine or granite also call for a different kind of thinset. Be prepared, it costs nearly double the price of the cheap stuff! This is not the time to skimp, if I'm going to all this trouble to install flooring, I want to make sure I do everything possible to keep it looking great for many years.


I started by installing Hardibacker cementboard throughout to provide a solid foundation that would not be susceptible to expansion or moisture absorption the way plywood would. It goes down over a layer of thinset and is nailed throughout with galvanized roofing nails.

By far, the trickiest part of this project was how to approach the winder stairs. They were to be tiled all the way down to the backdoor. We would also be doing a 6" marble 'baseboard' all the way around the room on the walls. The tiles were 12" squares so I cut them in half to use as the wall tile.

A heavy-duty professional tile saw is really useful for cutting stone tile like this, especially if you need straight cuts!

In order to not 'tile myself into a corner' I needed to start at the top of the steps and make my way down and out the back door. I used a tile spacer on the treads while I placed the tiles on the risers and taped them in place. Then, I could take the spacer out and install the tread tiles as I worked my way down.


I gave quite a bit of thought to the layout because I didn't want any weird grout lines going down the steps. I preferred to have a whole piece at the top of the steps and was able to achieve this without having any tiny pieces around the edges of the room. In the end the layout worked great, even with those crazy steps!

To be honest, the steps took extra time to cut and install, but it was a blast! I enjoyed the challenge of making them durable and safe as well as looking great.

Tomorrow, I'll cover a couple other details that were unique to this installation- stair nosing trim, and the mitered corners.

-Peter

www.CarpentryGuy.com

Tuesday, March 30, 2010

Work Outside Rain or Shine with a Canopy

With the spring rains coming, I new that I would need to get some weather protection or I would start getting rained out and my project would get off schedule. Nobody wants rain delays so I started looking into getting a small roof over my head, a.k.a. a canopy.

I was surprised to find so many offered. Most of them are called tents or 'wedding canopies' because they are most often used for outdoor parties. I just wanted a place to set up some tools so that I could still work, unless it was really storming.

I settled on the 10 x 10 Smart Shade canopy from Swiss Gear. They are the same folks that make Swiss Army Knives and their stuff is usually higher quality so I went for it.

I wasn't disappointed.

One day last week I needed to finish some trim and a light rain was forecasted all day. Time to give it a try! There was a break in the weather and I got it set up all by myself fairly quickly, probably less than 15 minutes. It would be easier with two people, but I was able to do it by going around and moving the legs out a little at a time. It didn't take long and I had a roof to keep me dry. It also came with a nice case that even has a couple wheels on it too.

I'm completely pleased with the purchase and thought I'd share in case you were considering one as well. I must admit that at first I felt like I was taping a TV show because they are always working under tents like this... :)

BTW- I'm also planning to use this as the summer starts heating up. I know I won't mind a little shade to keep me working with a smile.

-Peter


Tuesday, March 23, 2010

Open Up The Kitchen Please!

Sometimes the biggest changes to your home aren't the most expensive. For example, you could spend $10k remodeling your kitchen and upgrade everything and still feel cramped in a small room. For these homeowners in the Brentwood area, their budget was much lower, but the change was remarkable.

The split-level home was built with a kitchen wall that divided the kitchen from the living room. The problem was that the wall seemed to 'stick out' and make the rooms feel too divided. The homeowners also wanted more room for setting up a large dining room table for family gatherings. The solution was to remove part of the wall.


Unlike a couple of my other recent projects, this wall was load-bearing, supporting the ceiling joists from the two adjacent rooms. This meant that I would have to carefully build temporary walls along each side before tearing out the old framing and putting in a beefy 2x10 header. The header would extend all the way across the space to the outside wall. To save a little money, we decided to leave the header exposed and covered with drywall than to cut out ceiling joists and conceal it in the ceiling.


There was very little trim to do because I finished all the edges with drywall, however, I did make a small shelf for the serving window out of nice piece of 1x6 poplar. I notched the ends so that the board would seem to extend wider than the opening and give the effect of a window sill.


After removing around 32" of the wall, there was a little bit of hardwood flooring to patch in. It's always tricky to match the color of 50 year old hardwood floors perfectly, but this one seemed to blend in well with a coat of "natural" stain on some red oak.

The change made an incredible difference in this kitchen which now seems more integrated into the living room and ready for family!

-Peter

Saturday, March 20, 2010

How To Install PreFinished Oak Flooring

It's time to install the hardwood flooring in the hallway outside the new bathroom that I added to this home in Donelson. The homeowner wanted to match the hardwood in the rest of the home as much as possible so he picked out some pre-finished 3/4" red oak flooring for me to install.

The process for installation is very similar to installing unfinished hardwood. Here are the basics:


PREPARE
Before you begin, get the hardwood ahead of time and let it acclimate to the humidity inside the home. It's important to have a flat and solid subfloor to install the hardwood over. Over the subfloor I installed 15 lb felt paper underlayment across the floor, making sure to overlap the courses by several inches. Staple it down in a few places and make sure there's not anything trapped underneath that will make a 'hump'.

LAYING THE FLOOR


It's time to install the first piece of hardwood. Measure out from the starting wall and make a chalk line. It's good to use the straightest or longest wall as your guide. In my case, I wanted to make sure the line was parallel to the bathroom wall where I would end up. Select the longest pieces that you have and face-nail the first run in place all the way along your chalk line. It's important that your first piece is straight because it will be the guide for the rest of the flooring.

What's FACE-NAIL? Face-nail means that you nail through the 'face' of the board or the top where it will be seen as opposed to most of the flooring that will be nailed through the tongue so the nails are hidden.

Before I start laying the rest of the flooring I like to sort a batch of it by length. Usually, I would sort a couple cases at a time. You can see in the picture how I would divide it up. This just makes it easier to grab the pieces that I need without sorting through a stack of lumber each time.


With the flooring organized, grab one of the longest pieces and then a series of pieces that are each 6-8" shorter. When you lay them out like the picture above, it will stagger the seams as they are installed. By the way, if you are working with a helper, one of you can organize the stacks and pull the right wood while the other person nails it down.

Here's a trick to measuring the pieces that need to be cut: Take a piece that's approximately the right size (from the well-organized stack, right? :), and flip it around so the tongue is on the wrong end against the wall. Then you can just mark the length on the piece where it needs to be cut. This method will save you having to use a measuring tape for this cut and it will go a little quicker.

For each piece of hardwood, I started at the end where the tongue is and used a small block to make sure the pieces are super-tight. The block is a small piece of flooring with tongues and grooves. Using this prevents damage to the pieces I'm installing. Nailing through the tongue with my angled finish nailer, I work my way toward the other end, using the block as I go to make sure everything is tight.

NOTE: When installing a larger area of flooring, you'll want to use a special flooring nailer. It's better in two main ways: 1) It uses special flooring nails that have 'teeth' on them that makes a very strong bond and 2) It shoots the nails when you hit it with a rubber mallet. The force of the mallet ensures a tight fit while you're nailing.


As you get closer to the wall, you won't have space to use your nailer so that last three courses or so will need to be face-nailed. To get a tight fit, I like to use a couple blocks and then use a small flat bar to pry against the wall and squeeze the pieces together. Make sure you don't pry directly on the pieces you are installing!

The last pieces will likely need to be ripped on the table saw. Consider how wide the baseboard trim will be so you don't have a gap left later.

One of the noticeable differences between prefinished flooring and unfinished flooring is that there will be slightly more imperfections. Before an unfinished floor is sanded and sealed, the small gaps will be filled with woodfiller to hide them. There's also a difference in the quality of some of the brands of hardwoods. The differences are in how well they are milled to fit tightly together. The low-quality (cheap) brands will probably have more gaps because the milling wasn't as good.

I'm not one to tackle installing a whole house of hardwoods by myself, but this hallway was a lot of fun. Mainly, it's just cool to work with finished wood and see the amazing colors and designs in the grain. It looks great and it will last for many decades and more...

-Peter

www.CarpentryGuy.com

Thursday, March 18, 2010

Now for the Oak Steps

When I added a bathroom to this home in Donelson I raised the floor from the den to match the rest of the home. That meant that there would be three steps to build going to the den (see this post).

The homeowner has decided to have me add hardwood flooring to the hallway, but before I do that, I need to install the oak treads and risers on the steps.

There's usually a section at the home stores where they sell all kinds of stair parts like the treads, risers and balusters in basic red oak. That would have worked fine, except that these steps were 51" wide.
To find the wider cut treads and risers I went to JeffCo Flooring downtown. It's the super-secret place where the pros shop for hardwood flooring, including stair parts. They had just what I needed.


I started with the bottom riser and worked my way up. These steps will not have any trim on the sides to cover any gaps so I had to be exact with my measurements. I usually cut the pieces a little long and trimmed it to make sure it fit well. I put it all together without any fasteners and then took all the pieces outside for a good sanding.

Some people finish the wood before installation, but I like to install them before I finish. After a healthy dose of liquid nails, the treads were nailed in place with the risers. The top step gets a piece called stair nosing that is rounded on the front, but the back has a groove where the end-tongue from the flooring will fit. The stair nosing is sold by the foot, so you can just buy as much as you need.

I put a little painters tape on the wall to keep from making much of a mess and then applied the stain. These steps were stained with a Minwax color called "Natural". It's nearly the same as just using a clear coat, but I thought it was a slightly better match to the pre-finished red oak flooring that the homeowner wanted to install in the hall.

Letting it dry overnight and lightly sanding between coats, the steps will get two more coats of polyurethane after this stain.

Next comes the hardwood flooring...

-Peter


Monday, March 15, 2010

Inglewood Cottage Kitchen- Before and After

The kitchen at my Inglewood Cottage project needed some creativity to get to the shape it's in today- fabulous!!

(Professional photos by Zach Goodyear.)

Here are some of the challenges that were overcome:
1. Open the wall up between the kitchen and dining area and make it an arch to match the other doorways in the home (this post).
2. Make a spot to install a dishwasher next to the sink (this post).
3. Add counterspace on the wall next to the range where there previously was none.
4. Build a cabinet next to the dishwasher and over the range to hold the new hood (this post).
5. Level the floor around the back door (this post).
6. Make it all look like it fits with the character of the house.

I'd say we accomplished our goals.


The old kitchen had some good parts, namely, the cabinets. They were build to last and there was no reason to replace them. Instead, everything else is new- floors, counters, backsplash- but the cabinets just got some fresh paint and new hardware. Actually the cabinets are probably better built than many of the budget cabinets available today.

The subway tile backsplash is one of my favorite parts of the renovation, as well as the cabinets I got to build for above the range and next to the dishwasher. Nothing fancy, but it was fun to build a new cabinet and try to make it match the old so well that you wouldn't think it was new.

In addition to the cosmetic changes, the kitchen also got all new wiring and plumbing. It's ready for business!

By the way, when we got finished the homeowners listed the home for sale on a Friday and had it under contract before the open house on Sunday! Wow! I new it would get some attention, but that's an amazing story, especially in our current real estate market.


Check out all the articles related to this project at this link.

-Peter

Sunday, March 14, 2010

Inglewood Cottage Bathroom- Before and After

The project that I'm calling my "Inglewood Cottage" project has wrapped up and I wanted to feature a few before and after photos. Most of my work on this project was focused on two different rooms, the kitchen and bathroom. Let's look at the bathroom transformation first.

Professional photography (right) by Zach Goodyear.

This bathroom was nearly completely redone, however, most of the walls did not need to be gutted. However, I needed to remove quite a bit of the walls just to get that old cast iron tub out of there! The new surround was custom fit to go around the existing window that will let in natural light even though it will need to be covered with a curtain when showering.

When I started, there wasn't much appealing about this room. It did have a huge cabinet behind the door which we left alone and painted. Otherwise, all the fixtures had to go as well as the deteriorating vinyl flooring.

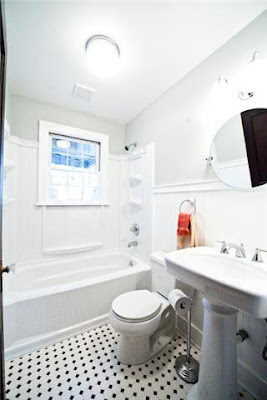
By the time I was finished, the bathroom had a lot of my favorite details- wainscoting, pedestal sink and small floor tiles. The black and white tiles turned out great and really fit the period feel of this room. In a room with so much white trim, the black tiles add some interest and are a highlight of the bathroom.


This bathroom is quite different than when I started and that's a very good thing! I really enjoyed being part of the changes in this small, but popular room of the house.. :)

See all the related posts to this project at this link.

-Peter

Saturday, March 13, 2010

Tile for the Inglewood Kitchen

It's been a while since I wrote about the Inglewood Cottage project. I finished my part to let the homeowners get everything painted before they put it on the market. I wanted to wait until after they were finished to get some final pictures.

Somehow, this home from the 1940's has retained much of it's character by still having the original hardwood floors and even the unpainted trim and doors. (A rare thing in this part of Inglewood). To continue the character into the remodeled kitchen, the homeowners wanted me to install a white subway tile backsplash and a ceramic tile floor.


When I got to it, there was an old backsplash made up of 4" off-white tile with a laminate counter that had actually been installed right over the top of the original countertop! I took it all apart and installed the new high-grade laminate counter (see this post) over the new dishwasher and custom cabinet that I built to fill it out. (see this post)

The new flooring tiles are 12" glazed porcelain, but they have the look of marble. I think it's a nice look for this older home. Part of the floor had to be leveled before tiling (see this post) and that turned out great.

-Peter

Friday, March 12, 2010

Open Up My Kitchen Wall- Before and After

When I started, the kitchen and dining room were two separate entities, now they are combined into one open space joined by the fantastic maple countertop that rests on the new half-wall in the middle.


I say it all the time, but I enjoy projects like this that really transform a home and add to my client's lifestyle.

See all the articles related to this project here.


Now, on to the next project!

-Peter

Thursday, March 11, 2010

Add a Decorative Newel Post

After the maple countertop was installed (this post), it was time to finish up by adding the trim. For the most part, I was able to reuse the casings and jambs from the old doorway that was here except for across the top of the new opening. In addition to the casings, the homeowners wanted me to add a decorative post at the end.

For the post, I used a poplar newel post that is normally used as part of a stairway handrail. Ahead of installation I cut off the ball on top and then primed and painted it.

I hated to write on or put screws into the beautiful countertop, but alas, it had to be done! First, I taped a scrap of building paper to the spot so that I could mark my guidelines and make sure that I didn't make any unnecessary pencil marks on the counter. I left this here through the installation and just tore off the paper after the post was in place.


I bought a 'newel post bracket kit' to install the post. The kit includes four brackets to attach the post and then some decorative trim that is pre-cut and meant to cover the brackets. (I painted these ahead of time as well.)

I cut the post around 1/8" short and then used shims underneath to press it snugly up against the top jamb. The gap on the bottom will be covered by the brackets and this prevents it from being so tightly fitting that I risk any scratches to that countertop. (Yes, I'm being very protective of that counter, they aren't cheap to replace!! :)

I fastened the top of the post with some finish nails and then covered the holes with putty and paint.


-Peter

Tuesday, March 9, 2010

Install the Maple Countertop

In deciding to open up the wall between the kitchen and dining room, you'll have another decision to make: What to do with the wall? You could remove the wall completely, make a serving 'window', or make a half wall with a countertop.

If you want to install a countertop, the next question becomes, "What kind?".

There are a multitude of options for countertops these days and for an application such as this where it is away from the water and food prep areas you can be even more flexible.

Some people might want to match their existing kitchen counters which are solid surface in this case. However, in my last three projects like this, the homeowners decided to instead have a custom-made wood countertop made just for their kitchen.

I get my friend Chris Barber at Barber Woodworking to craft these fine counters for me. He is an artisan to be sure with most of his projects involving custom cabinetry of some kind. If you'd like to see more of his woodworking art check out his website at www.BarberWoodworking.com.

At this current project, the homeowners wanted to coordinate the counter with their maple kitchen cabinets and a maple table in their dining room. Chris once again did a fabulous job and the homeowners were quite pleased with the result.

Now, it's time to finish things out with some trim and paint.

-Peter

Monday, March 8, 2010

Make a Plastic Wall to Control Dust

There is one thing that all of my clients are concerned about when I come into their home- THE MESS! Frankly, I don't like a mess either and I do my best to maintain an organized jobsite and put highest importance on protecting their home from the side effects of remodeling, including dust.

The most effective way that I've found to control dust inside a client's home is to basically build a wall out of thin plastic. If sensitive electronic items cannot be moved (like large TVs) I cover them first with a clean sheet of plastic in addition to building a plastic wall across the room. I use blue painter's tape to seal it all the way across the ceiling and down the walls.

Often, the jobsite can be contained in one room or portion of the home, so I can just put the plastic across the door way. The point is, that I try to build a contained work area so that the dust does not spread throughout the home.

TIP: When you're making the most dust, like during demolition or sanding drywall, turn off the HVAC system. This helps the dust to not circulate throughout the home as well as clogging up the ductwork.
In addition to plastic walls, I use a variety of floor coverings to protect floor surfaces. I'm a big fan of large canvas drop cloths in areas where I'll be working. I cover any carpet that is in my path with adhesive plastic that is meant for temporary carpet protection. Finally, a roll of brown construction paper comes in handy for covering hardwood floors or other smooth surfaces.

It can be a lot of work to prep a jobsite beforehand, but I'm a lot more comfortable working there if I know that I've taken the adequate steps to minimize my mess and the possibility of damage to the area.

-Peter

Saturday, March 6, 2010

Add Some Recessed Lights Over the Bar

As I started rebuilding the wall between the kitchen and dining room that would transform into a half-wall topped with a wood counter, I had to consider the lighting that would illuminate the custom maple counter. This is especially important at this stage because the homeowner wanted me to install small recessed lighting.

This wall is completely non-load bearing and consists of studs placed 24" apart. Since it's not load bearing I won't need to install a large header across the opening. Instead, I'm thinking of it like a large soffit that will mainly hold drywall and contain the recessed lighting.

By the way, the kitchen side of this wall is covered in wallpaper. This means that I'll do all my work to the wall from the other side in the dining room and try to preserve the wallpaper as much as possible. I'd prefer to not hang wallpaper, and my client's would agree I'm sure.. :)
The fixtures that I'm installing are 3" recessed cans that are widely available. They can be used in new construction and hung with joist hangers or installed as part of a remodel where you only need to make a hole and then mount the fixture with the drywall clips.

To start, I measured my opening and marked the location for the lights so they would be spread evenly across the opening. I cut these holes out of the 2x4 bottom plate before I even installed it. Then, I went ahead and ripped a long piece of poplar 1x6 to the width of the wall (4.5") and cut openings out of that for the lights. This would go along the bottom of the opening and finish it off well.

The electrical connections are fairly basic if you know how to wire any light fixture. Thankfully, I had easy access to the attic to run a wire across the room to the switch, which was to be a dimmer switch, giving the homeowners more control of how bright the lights are.

By the way, recessed lighting is also much less expensive the most fixtures. For example, these 3" fixtures are around $10-15 each, while pendant lights would likely run $40-50 or more.

At 50 watts each, these lights will really help to show off the new Maple countertop that's coming soon.

Peter

www.CarpentryGuy.com


Thursday, March 4, 2010

Open up My Kitchen Wall

NOTE: If you've been following along on my bathroom addition project (these posts), I'm taking a couple weeks away from that to help some other clients. I'll be back to the bathroom soon to add marble tile floors and some hardwood in the hallway...

I always enjoy projects that result in a major positive transformation at a home, especially when it adds functionality. This week I'm helping some clients in Smyrna who wanted me to open up the wall between their kitchen and dining room and install a wood countertop.

I've also completed similar projects for two other neighbors down the street in this newer community. See them here:

Project with Red Oak Countertop (click here)
Project with Heart Pine Countertop (click here)

Each project has been a little different. With this one, there are three main differences. First, the kitchen wall has been covered with wallpaper. This means that I'll need to work from the dining room side and be super-careful not to damage the wallpaper as I'm removing framing and opening up the wall.

The second main difference is that these clients want me to install small recessed lighting fixtures above the bar. Normally, you would have a beefy header across an opening like this and installing recessed lighting would not be possible without some major creativity. In this case, the wall is NOT load-bearing, so I won't need the header and I'll have room for the lights.

Lastly, these clients want me to add a decorative post on the end of the bar, not so much for structural reasons, but they simply like the look of it ( and want to do something different than their neighbors :).

Anyway, I'm looking forward to this project. Stay tuned to watch the progress.

-Peter