Same guy- new name - new website!

You will be automatically redirected to the new address. If that does not occur, visit
http://InspiredRemodeling.com/blog
and update your bookmarks. Thanks! -Peter

Saturday, February 27, 2010

My Review of Milwaukee Heavy-Duty 33 Pocket/3 Piece Tool Belt

Originally submitted at Hardware Sales Inc.

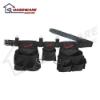
Milwaukee's Heavy-Duty 33 Pocket/3 Piece Tool Belt is made from water-resistant 600 Denier Ripstop Polyester Material. The Tool Belt features 33 total pockets of various sizes and shapes, large flat bottom pouches, builder's square pockets in each large pouch and a cell phone or 2-way radio...


The perfect tool belt for me

By CarpentryGuy from Nashville, TN on 2/27/2010

5out of 5

Pros: Holding Capacity, Comfortable Fit, Versatile, Durable

Best Uses: Multi-Purpose

Describe Yourself: Professional

I'm a contractor and I handle a wide range of projects from framing to tilework. I wanted a tool belt that had some pouches, but also had lots of pockets to organize my tools. My last tool belt had just a couple big compartments and my tools were always getting lost in the bottom.

I was pleased when I got the Millwaukee belt because of the number of pockets and how they were organized. I also love the two 'bottomless' pockets which will hold my small flatbar and my drywall saw. It's also easy to remove one of the pouches from the belt if you don't need all of your tools for a particular project and want a lighter load.

I'm completely happy with this tool belt, and the price made it a no-brainer.

(legalese)

Sunday, February 21, 2010

Winder Stairs- Finish With a Handrail

When you're framing the stairs, it's worth giving some thought to the handrail.

Often, the handrail can be attached to a wall, so this is the time to add some blocking so you have something solid to attach it to- in the right place.
In my case, I've got a wall, but this is a winding stair, which complicates things.
For this particular project. I decided to frame in a short wall which rises around 30" above the front edge of the treads which will be covered in drywall with a handrail attached on top.


The difficult part to this is getting the angles right. As I mentioned in my post about the layout (here), the narrow end of each tread is 6" across. With a 6 1/2" riser, we know that the angle will be close to 45 degrees. I found that a 48" miter worked for me.

My idea was to treat this similarly to a newel post that might have a handrail coming into it from one direction and then continuing on from another side in the new direction.

-Peter

www.CarpentryGuy.com

Friday, February 19, 2010

Winder Stairs- Build the Treads

Yesterday, I wrote about how I did the layout for my small set of winder stairs (this post). Now, let's talk about how I built the treads.

Often, you can build the treads as a series of platforms and then just stack them and secure them in place. I'm going to frame each one individually, frankly, because I didn't have enough extra plywood to make the platforms... :)

Before proceeding too far, of course, I needed to consider the height of each riser. The total rise of my stairs was 26" so each step would be 6 1/2" high.

The risers would be made from 2x8's and be the frame that supports the 3/4" plywood treads. To achieve this height I ripped each of the 2x8's to 6 1/2", except for the bottom ones that were 5 3/4". (The bottom of the stairs is always thinner by the thickness of one tread)

You can see the progression in the pictures as I framed each step from the bottom up.


One of the more challenging (and fun) parts of this was getting the angles right. Most of the angled cuts were 30 degree miters, with a few 15 degree ones involved with the middle step.

All of these treads are secured to the surrounding framing, with blocking added where necessary to secure everything. The treads are nailed to each frame after on a bead of liquid nails to seal everything together.

Next, I'll add an interesting handrail...

-Peter

www.CarpentryGuy.com

Thursday, February 18, 2010

Winder Stairs- Layout First

Raising the floor in the new bathroom meant that we would need 3 steps down to the landing at the backdoor. The problem was that there wasn't much space to work with. We needed to use the minimum footprint as possible. We also needed to make a turn to guide the user up into the bathroom to the right. This meant that a 'winder' stairway would be needed.

A winder stairway is basically defined as a stairway whose sides are not parallel. There are different codes that cover these stairs to keep them safe. Let's start this project by looking at how to layout this simple winder.

TIP: Need more info about all the code requirements to building great stairs? Check out this "Visual Interpretation" of the code from the Stairways Manufacturers' Assosciation. (Click Here)
1. I started with a large piece of plywood that I would be using to make the treads. I drew a square in one corner that was 36" on each side. My winder would end up being 36" deep, but 41" wide at the bottom step. Still, I started the layout by using a 36" square.
2. Draw a diagonal line from one corner to the other. (A black line in the picture) Then make a mark 18 3/4" from each corner on this line.
3. Draw two lines from another corner through both of these marks you just made. (The white lines in the picture.) By doing this you have outlined each of the three treads for the steps.
You'll notice that the narrow part of these treads is very small. Sometimes you'll see an old staircase that uses the treads like this. Of course, this is quite dangerous because there's not really room to place your foot making it more likely to slip and fall. So, the codes now say that the tread shouldn't be less than 6" wide at its smallest point.
4. Draw a line, square to the edge of the first step, at the point where the tread is 6" deep. Continue marking the other steps at this point as well like I did in the picture. Cutting this out can present a problem if you're turning a tight corner like I am. Often you can make a long turn around a corner but in my case I'm going to build a short wall in this place to support the required handrail. We'll get to that soon enough.

5. With the basic treads laid out, I wanted to consider the actual dimensions of my stairway. Mainly, I needed to make a new line at 41" wide because that's how wide my stairs are at the bottom.
6. Go ahead an cut out the treads. These will be the guide for building the platforms that will hold them. Let's cover that tomorrow.

-Peter


Tuesday, February 16, 2010

Adding Some Steps Into the Den

In conjunction with raising the floor to add the bathroom to this home, I would need to build some new steps at the end of the hall leading down into the den. For stairs, this is about as basic as you get. Walls on both sides with no turns or obstacles to consider.

With any stairway, I need to spend some time doing math before I start cutting any lumber. There are some basic guidelines to building steps and I covered them more thoroughly in this post.

The height of the new floor dictated that I would need 4 steps, each one with 6 1/2" rise. This is comfortable height so that works great. I would make each of the treads 11" deep.

I cut three stringers out of treated 2x12 boards. I fit them in place to test the fit before I nailed anything. Using a level, I could tell that the concrete floor wasn't quite level making one of my stringers higher than the others. To fix this, I shave a little extra off the bottom of the stringer and added shims where needed. In order to have level steps I have to have level stringers!


After the stringers were in place, I added some cross supports to add more strength under the treads that would be plywood and possibly covered with carpet later. I also applied a bead of Liquid Nails Adhesive before nailing the treads down. All of this helps to prevent squeaks later and give the homeowner a solid set of stairs.
Next we'll work on a set of winder stairs... stay tuned!

-Peter

Monday, February 15, 2010

Out With the Old, In With the New Floor

The room where we're adding a bathroom to this home was at one time a garage. It was converted a few years ago, but is still a couple feet lower than the rest of the home. The first phase of this project was to remove the closet and surrounding drywall that would be in the way of the new framing.

OUT WITH THE OLD

The closet was completely not load bearing and had been constructed with minimal framing, basically just enough to hold the drywall up. It came out fairly easily. When doing this kind of demolition work I always take it apart the way it was put together. First, I carefully remove the trim and doors and set them aside to be reused.

After the trim is out of the way, I do my best to remove the drywall in large pieces. Then I can bag the pieces and dispose of them. While I'm at it I like to go ahead and clean off all the studs by removing the nails or screws that had been holding the drywall. My goal is to reuse as many of these building materials as I can, but many of these studs aren't straight enough to make for good framing.

The closet had a lowered ceiling that I wanted to remove as well. Before taking off this drywall, I bagged all of the loose-fill insulation that was in the attic above. A dustpan actually makes a great tool for scooping this up and bagging it. I'll reuse the insulation later and save myself a huge 'blizzard' of pink insulation when I bring down the ceiling drywall.

FRAME A NEW FLOOR
Removing the walls reveals the floor framing for the adjacent kitchen that rests on the cinder block wall that runs around the perimeter of this former garage. I would be building the bathroom floor on this wall as well. Thankfully, the wall was nearly perfectly level, which is often not the case in old garages.

I will be framing the floor as one large platform first, and then add the bathroom walls that will rest on top of the floor. I'll also be adding two small stairways that will lead down to the old garage going into the den or at the backdoor.

I put a lot of thought into how the framing would work and where the walls would go before I got started. There are lot of factors in this particular project to consider such as the dimensions of the stairs and where the plumbing would go.

The floor joists would be 2x8 stock to match the size of the rest of the house, and provide plenty of strength to support the slate tile that the homeowner is considering for the bathroom floor.

TIP: Wondering if your floor will support tile or natural stone? Check out the calculator at the John Bridge forums here to calculate your floors deflection and see if it makes the cut.
-Peter

www.CarpentryGuy.com

Friday, February 12, 2010

Add a Bathroom to Your Home

I'm embarking on a new project for a homeowner in the Donelson area. He just bought this home from the 1940's. Much of it was updated after a fire a few years ago, but it still had only one bathroom. It's time for that to change.

On one end of the home is a room that obviously started out as a garage, but was later transformed into a den with a large closet that probably held the laundry at one time. The idea for this project is to completely remove the closet, raise the floor to match the rest of the home and then add a 2nd bathroom.

This is a difficult one to explain, even if you're looking at my rough sketch (pictured below).
There are a couple tricky parts to this project. First, is the prospect of raising the floor. This room's floor is around 28" lower than the rest of the house. Thankfully, that's enough space for me to frame a new floor and still have an 18" crawlspace to access underneath.

Raising the floor will require adding two sets of stairs. One, at the end of the hall that will descend into the den. The other will actually be inside the bathroom. To make all of this work, the new bathroom will enclose the back door and have three 'winder' steps leading down to it.

It will be an interesting project with some very interesting parts that will have to come together to be a bathroom that is not only functional, but also up to code and built to last.

I like a challenge!

-Peter

Thursday, February 11, 2010

One Fix For A Leaky Outdoor Faucet

One of the most annoying things is a leaky faucet. I find it especially annoying to turn on an outdoor faucet and have water dripping everywhere. The most common problem, if you're using a garden hose, is that the small gasket is missing that goes between the hose connector and the valve.

But what if the water is dripping out of the valve instead of the hose?

Let's look at this example... The other day I was using a client's outdoor hose to mix mortar to lay tile. It was a townhome and the water valve was actually located in the garage. It dripped badly. Soon it was running through the garage and pooling just outside the garage door.

For a while, I didn't bother with it. After all, I was there to tile, not to fix the plumbing, right?

Then, I couldn't take it anymore.

The fix for a leaky valve is usually so easy it seems silly. Get out a wrench and tighten the nut holding the handle on. You can see how I did it in the picture below. If that nut gets just a little bit too loose, the valve will not operate correctly and water will drip (or spray) out of the handle.


Don't overdo it, but just a little pressure with a wrench and the dripping should stop. If it doesn't, it's probably too worn out and needs replacement. Usually, they are just loose and need to be tightened up.

At least you can give this a try before you call the plumber and spend the big bucks.

-Peter

Monday, February 8, 2010

Upgrade to a Double Sink Vanity

My most recent project was to help a family with some work around their beautiful older home near Sevier park in Nashville. The home was renovated a few years ago to include many modern upgrades including a small upstairs bathroom.

The bathroom was nice before, but it services three upstairs bedrooms and the homeowner wanted more capacity to keep up with their growing family.


When I started it had a pedestal sink and a small mirror that was hung to low to see your face without bending over. It was also quite dark and needed more light. On top of these things, they needed an exhaust fan to get more of the humid air out.

The solution for this homeowner was to add a double vanity. (And a bath fan, three lights and two bigger mirrors... :)

Adding a double vanity is a little more complicated than just replacing a sink. Often, each sink needs a separate drain pipe and supply lines instead of just one set for a pedestal sink. Thankfully, there is a small attic access panel in the closet that lets me get behind the wall with all the plumbing in it.

In addition to adapting the plumbing, I moved the wiring and added a couple more lights on either sides of where the mirrors would be located as well as adding a high powered, yet quiet, exhaust fan that will help get the moisture outside through a vent in the roof.

After a few days of work, this smaller bathroom was bright and ready to handle more customers. Of course, at this point, most of them are still under the age of two...

-Peter