Some clients of mine in Inglewood wanted me to install a lamp post that they had purchased to illuminate some stairs leading to a parking area at the side of their home. The light will help them not fall down the stairs, and look great in the daytime as well.Wednesday, May 19, 2010
Easily Install a New Lamp Post
Some clients of mine in Inglewood wanted me to install a lamp post that they had purchased to illuminate some stairs leading to a parking area at the side of their home. The light will help them not fall down the stairs, and look great in the daytime as well.Thursday, April 8, 2010
Waterproof the Tile Shower With Schluter Kerdi
What the heck is Schluter Kerdi???
It's a fairly new system for waterproofing showers that involves installing a membrane (the Kerdi) throughout the shower and over their special Kerdi drain. When finished you'll have a completely waterproof, sealed shower. In fact, it's so waterproof that you can install the Kerdi right over regular old drywall. That says a lot.
Let's look at how I installed the Schluter Kerdi shower system when I was repairing and old leaky shower pan liner that was decades old. In my last post (this link), I tore out the old tile down to the framing. Next, I replaced the subfloor with new plywood and added 1/2" Hardibacker on the walls. (Yes, I could have used 1/2" drywall, but I had the Hardibacker on hand...)
INSTALL THE PRE-SLOPED SHOWER TRAY
The older method to doing a shower floor included making a sloped bed of mortar that would direct water toward the drain. This needed more time, labor and expertise. For this shower, I used a Schluter pre-sloped shower tray. It's made out of some kind of foam and is easily cut to fit your particular shower.
After cutting the tray to size, I dry-laid it in place to mark the spot for the drain. Once the drain hole was cut out, I covered the floor with unmodified thinset mortar using a 3/16" v-notch trowel. The shower tray sets in this. You can walk around on it to make sure it's well embedded in the mortar. Just be careful not to crush it with your knees as you are working- it is foam after all.
INSTALL THE KERDI MEMBRANE
I'm not going to go through every detail of installing the membrane. If you are interested make sure to get the Schluter installation DVD and check out www.Schluter.com. The DVD comes with the shower kit and is great at showing every step along the way.
Basically, the membrane is installed over a thin layer of mortar and then flattened out and embedded using the straight edge of your trowel. The edges must all overlap by a minimum of 2". I started by using something they call Kerdi-Band in all the bottom corners. (It's just a thin pre-cut strip of the Kerdi material.)
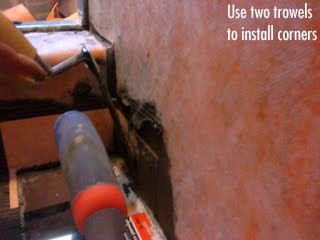
It helped to have two trowels or a putty knife so you can hold the membrane in the corner with one trowel while you smooth out the other side with the other one. It's important to have tight square corners so that your tile will fit together correctly.
Once all the corners are done I installed larger pieces of Kerdi on the walls that overlap the corner pieces. Smooth them out to make sure there aren't any air bubbles underneath. Schluter also makes special corner pieces that a pre-formed to fit into corners and over the curb corners.
INSTALL THE KERDI DRAIN
The walls are done- let's do the floor. I covered the floor with a layer of mortar and then pressed the Kerdi Drain into place. The flange has openings that will help it firmly integrate into the mortar. I spread a little more mortar around the flange and installed the Kerdi membrane, making sure to fully embed it, especially around the drain.
That's it! Let it set overnight and we'll be ready to install the tile.
-Peter
www.CarpentryGuy.com
Saturday, March 20, 2010
How To Install PreFinished Oak Flooring
for me to install.The process for installation is very similar to installing unfinished hardwood. Here are the basics:
PREPARE
Before you begin, get the hardwood ahead of time and let it acclimate to the humidity inside the home. It's important to have a flat and solid subfloor to install the hardwood over. Over the subfloor I installed 15 lb felt paper underlayment across the floor, making sure to overlap the courses by several inches. Staple it down in a few places and make sure there's not anything trapped underneath that will make a 'hump'.
LAYING THE FLOOR
It's time to install the first piece of hardwood. Measure out from the starting wall and make a chalk line. It's good to use the straightest or longest wall as your guide. In my case, I wanted to make sure the line was parallel to the bathroom wall where I would end up. Select the longest pieces that you have and face-nail the first run in place all the way along your chalk line. It's important that your first piece is straight because it will be the guide for the rest of the flooring.What's FACE-NAIL? Face-nail means that you nail through the 'face' of the board or the top where it will be seen as opposed to most of the flooring that will be nailed through the tongue so the nails are hidden.
Before I start laying the rest of the flooring I like to sort a batch of it by length. Usually, I would sort a couple cases at a time. You can see in the picture how I would divide it up. This just makes it easier to grab the pieces that I need without sorting through a stack of lumber each time.

With the flooring organized, grab one of the longest pieces and then a series of pieces that are each 6-8" shorter. When you lay them out like the picture above, it will stagger the seams as they are installed. By the way, if you are working with a helper, one of you can organize the stacks and pull the right wood while the other person nails it down.
Here's a trick to measuring the pieces that need to be cut: Take a piece that's approximately the right size (from the well-organized stack, right? :), and flip it around so the tongue is on the wrong end against the wall. Then you can just mark the length on the piece where it needs to be cut. This method will save you having to use a measuring tape for this cut and it will go a little quicker.
For each piece of hardwood, I started at the end where the tongue is and used a small block to make sure the pieces are super-tight. The block is a small piece of flooring with tongues and grooves. Using this prevents damage to the pieces I'm installing.
Nailing through the tongue with my angled finish nailer, I work my way toward the other end, using the block as I go to make sure everything is tight.NOTE: When installing a larger area of flooring, you'll want to use a special flooring nailer. It's better in two main ways: 1) It uses special flooring nails that have 'teeth' on them that makes a very strong bond and 2) It shoots the nails when you hit it with a rubber mallet. The force of the mallet ensures a tight fit while you're nailing.
As you get closer to the wall, you won't have space to use your nailer so that last three courses or so will need to be face-nailed. To get a tight fit, I like to use a couple blocks and then use a small flat bar to pry against the wall and squeeze the pieces together. Make sure you don't pry directly on the pieces you are installing!The last pieces will likely need to be ripped on the table saw. Consider how wide the baseboard trim will be so you don't have a gap left later.
One of the noticeable differences between prefinished flooring and unfinished flooring is that there will be slightly more imperfections. Before an unfinished floor is sanded and sealed, the small gaps will be filled with woodfiller to hide them. There's also a difference in the quality of some of the brands of hardwoods. The differences are in how well they are milled to fit tightly together. The low-quality (cheap) brands will probably have more gaps because the milling wasn't as good.
I'm not one to tackle installing a whole house of hardwoods by myself, but this hallway was a lot of fun. Mainly, it's just cool to work with finished wood and see the amazing colors and designs in the grain. It looks great and it will last for many decades and more...
-Peter
www.CarpentryGuy.com
Monday, March 8, 2010
Make a Plastic Wall to Control Dust
The most effective way that I've found to control dust inside a client's home is to basically build a wall out of thin plastic. If sensitive electronic items cannot be moved (like large TVs) I cover them first with a clean sheet of plastic in addition to building a plastic wall across the room. I use blue painter's tape to seal it all the way across the ceiling and down the walls. TIP: When you're making the most dust, like during demolition or sanding drywall, turn off the HVAC system. This helps the dust to not circulate throughout the home as well as clogging up the ductwork.
Thursday, February 11, 2010
One Fix For A Leaky Outdoor Faucet

Thursday, January 28, 2010
Repair a Broken Toilet Flange
Toilets are not especially fun to deal with. This week I've been tiling a couple bathroom floors for one of my favorite clients and was ready to reinstall the toilet. Everything was moving smoothly until I noticed that the PVC toilet flange was cracked and broken.
By the way, make sure you use some kind of moisture resistant screws that won't rust and eventually break. (No drywall screws allowed here. :)Monday, January 25, 2010
Install a Roof Vent for Your Bath Exhaust Fan


Friday, January 8, 2010
How To Level the Floor Before You Tile
Many times the back part of an older home presents a problem because it's often a porch that was enclosed, or in the case of my Inglewood renovation, likely an old breezeway. The floors are often a problem because the structure just wasn't constructed as well in the beginning.

Thursday, January 7, 2010
Drywall for an Arched Doorway
Check out this post to see how I did the framing for the curved corners. Now it's time to drywall those curves.

In the background of this photo you can see the arched doorway into the living room that I was trying to match. Hopefully, future homeowners will just think it was always like this!Monday, January 4, 2010
Build a Basic Cabinet
After removing some kitchen cabinets next to the sink to make room for the new dishwasher, (see this post), I had a 36" space to work with. The dishwasher is only 24" wide, so what should we do with the extra 12"?Let's build a cabinet.
The homeowners wanted something simple so I thought I could make a 12" cabinet to match the originals in the kitchen, except it would have two open shelves rather than any doors or drawers. Here's the basic process:
CABINET FACE
1. The hardest part is to make the face of the cabinet. Before you start, consider the exact width and height and exactly where you want the shelves and toe kick. For this project, I could easily measure the existing cabinets and design mine to match.
2. Once I had the dimensions in mind, I ripped some old boards that came from the house that were the same thickness as the original 7/8" thick cabinet faces.
3. Make the joints. The original cabinets were assembled using something called a half-lap joint. It's made by removing half of each piece so that when they are joined the surfaces are flush. It's sort of like working with Lincoln Logs... :)I cut the joints on my table saw by setting the fence to the maximum depth of the joint, in my case, 1 1/2". I set the saw depth so that it would cut exactly half-way through the piece. After the first cut, make successive cuts from that point all the way to the end of the piece or as wide as the notch needs to be. (By the way, use all the appropriate safety precautions so you keep your fingers.) It's a great idea to test fit a couple pieces and adjust the height and fence until you're sure that the pieces will fit snugly and flush with each other.

4. I dry-fit the face of the cabinet to make sure it was right and then assembled it with glue and clamped it in place until it was dry.
CABINET BODY
5. Next, I needed to make the body of the cabinet which would consist of plywood sides and back. I cut the sides first out of cabinet-grade 3/4" plywood which is sanded smooth and free of knots, etc. The quality for this is not all that important because it will be hidden. Mainly, for this cabinet, I'm trying to match the quality of the original cabinets that were 70 years old...
6. The last piece would be the plywood for the back. This adds strength and holds it all together. Usually, some 1/4" plywood is fine for this.
7. With a smaller cabinet, this is a good time to think about shelf supports because it's easier to install them before the cabinet is assembled. Usually, a simple piece 3/4" plywood along the side is enough to hold the shelves. Make sure that you adjust the height of the supports so that the shelf height is flush with the face frame. This allows the face piece to hide the edge of the shelf and makes it look much better.
LET'S ASSEMBLE
8. This cabinet would be painted, so It wasn't as important to hide all the fasteners and get too fancy. Remember, I'm trying to keep it simple and not spend to much time (and money) to get this cabinet done. So, instead of assembling with biscuits or even pocket screws, I stood the pieces up, made sure everything was square, glued and nailed them in place with my finish nailer. With a little putty those nail holes will disappear after it's painted.
9. All that's left is to cut a couple shelves to the right size and add the toe kick. I suppose you wouldn't have to nail the shelves in place, but I like to secure them unless they are adjustable.
10. Lastly, add a corner brace or two in the places where the countertop will be secured. You'll be happy you did when you go to screw down the countertop.Paint it and you're done! For mine, the paint will come later. It was still fun to create a functional piece like this that will get a lot of use and match the original cabinets.
-Peter
www.CarpentryGuy.com

Sunday, January 3, 2010
Add a Dishwasher and Save the Cabinet!
Of course, our Inglewood project house from the 1940's wasn't designed with a space for a dishwasher. However, it's almost a requirement for today's lifestyle, especially if you want your home to be more appealing to home buyers.
There weren't many cabinets to begin with and even less counter space. We knew we wanted to replace the counter and add a new tile backsplash, but how would we fit a dishwasher into this space? Could we also add more counterspace while we're at it?At first we tossed around the idea of building a separate cabinet that would contain the dishwasher next to the stove. This may have worked, but presented problems making the plumbing connections because the dishwasher would be on the opposite wall from the sink.
The better option would be to remove some cabinets and add the dishwasher next to the sink, saving and repairing the cabinets to be placed on the interior wall next to the stove. This plan would solve the plumbing issues and give the homeowners nearly 36" more counterspace next to the stove. That's a win-win!
(I also widened the doorway in the kitchen picture above to help the traffic flow and better connect the kitchen to the cozy dining area. See this post)

Monday, December 7, 2009
Solder a Simple Copper Connection


Friday, November 20, 2009
How To Fix A Wobbly Half Wall on A Slab
In opening up the wall between the dining room and kitchen at my current project, I've found that the remaining half wall is very wobbly and tends to lean back and forth. This is a problem because we'll be putting a bar top on this wall and it's likely that someone will lean on it from time to time.
2. I'm using something called a "hex sleeve anchor" to secure the bottom plate to the floor. The idea is to drill a hole in the cement then drive these down. As you tighten the nut it draws the bolt upward and spreads the anchor out which makes a very tight fit in the concrete. I'm using 3/8" diameter bolts that are 3" long.
The anchors hold the bottom plate very securely and greatly reduced the movement of the wall, but I also needed some extra bracing to keep the studs from moving back and forth on the bottom plate. For this I used a couple scrap 2x6's with 45 degree angles on each end. I nailed it in place and even drove some heavy duty Spax screws into it as well. Tuesday, November 17, 2009
How To Add Valves Under The Sink
If you don't have a valve, by all means, add one when you're working on it!!
2. Disconnect the current supply lines- under the sink, in my case. If they are stuck, you might try using a little WD-40 to loosen them up.Wednesday, October 21, 2009
Drywall Technique for Finishing Those Pesky Corners
I've covered my process for 'mudding' drywall in this post. I covered the basics of how to mud three times and then sand just once. Let's get a little more specific on how to mud the inside corners to get a sharp line without lots of sanding.
On the first layer of mud, the idea is just to embed the tape. It doesn't take a lot of mud. As I've mentioned before, one important thing to remember is to "make the edges disappear" by keeping it thin on the edges.
4. When you've done it right, you'll have a slight ridge where the edge of the corner knife was. By "slight" I mean barely noticable. On the third coat of mud, you'll fill on both sides of the ridge to end up with a nice corner.Remember to check out this post, for even more detail on how I finish drywall.
Saturday, October 17, 2009
Layout for the Kitchen Tile
Using this dimension I measured the walls of the room to see how best to lay the tile. I was hoping to start with a full piece at the doorway and end up with around a half a piece at the opposite wall. This plan worked well and I could tell by dividing the length or width of the room by 13.375.
Friday, October 9, 2009
Easy Faucet Repair


7. Turn the water back on and test.
Tuesday, October 6, 2009
Add Some Simple Steps
Long before we can start building, we have quite a few things to consider to get our stairs right.
So, if you're hanging with me, it's time to layout our stringers on a 2x12 using these two dimensions. You can see in the picture how mine looked before I cut it. Use a framing square to make the marks and double check to make sure you are as exact as possible in your measurements. 
www.CarpentryGuy.com