Same guy- new name - new website!

You will be automatically redirected to the new address. If that does not occur, visit
http://InspiredRemodeling.com/blog
and update your bookmarks. Thanks! -Peter

Showing posts with label Before and After. Show all posts

Monday, May 10, 2010

Kitchen Upgrade With Laminate Flooring

While I was working at the most serene jobsite (see this post :), I was transforming a kitchen by upgrading the flooring to a new high-quality laminate.

Laminate flooring these days refers to a type of flooring that is often meant to resemble some type of wood flooring, even though it is not. It's quite thin and is actually fairly easy to install. There's much less labor involved than with real hardwood or tile, making it a lower-budget alternative.

The flooring actually 'floats' which means it's not nailed or glued down to the subfloor. This is important because the flooring is expected to expand and contract with changes in weather and humidity. For this reason, I left at least a 1/4" gap all the way around the edges to give it room for expansion. This gap is easily covered with shoe moulding.


The change in this kitchen from the old vinyl is amazing. The homeowner is going for the cute cottage look but didn't want to go to the expense of tiling the kitchen. Laminate is a great and affordable choice for quickly transforming the entire space.

This particular flooring was called "Casual Living" from Pergo. I think the homeowner bought it at Lowe's. Anyway, I wanted to report that it went in well and made great connections throughout. With any pre-finished flooring, I think that you tend to get what you pay for most of the time. Some of the less expensive brands tend to have more gaps because they don't fit together as well, at least that's been my experience.
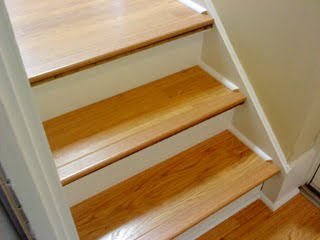
There's a small stairway off of this kitchen that leads down to the basement stairs and the backdoor. Installing the laminate flooring on the stair required a fancy piece of trim called the stair-nosing. The trim has a notch in the back to overlap the flooring and curve around the nose of the step. This trim had to be special ordered and wasn't cheap! However, if you want it to look right, this is the way to go.

-Peter

Thursday, May 6, 2010

Makeover the Bathroom With a Tile Floor

This recent project involved laying a tile floor in a new home that was originally built with vinyl around the toilet/tub and carpet around the vanity. This is quite common in newer homes, and it's any easy spot to upgrade and completely change the feel of the room.

The vinyl and carpet had to get ripped out and then I worked on a layout for the tile. The home was built on a cement slab so there was no reason to add extra cementboard before tiling. This makes the project move along quickly and saves the homeowner a little money as well.

These were 12" tiles, but this shade comes in various sizes. You can get as fancy as you want if you mix others in to come up with a pattern.

-Peter

Tuesday, May 4, 2010

How About Some Tile Above the Surround?

Many newer homes are built with a standard fiberglass bathtub surround. It still works so you hate to remove it, but maybe you'd like to spruce it up a little. These homeowners asked me to add some tile around the top of theirs as I was working on their floors.


The bathroom had been wallpapered, which looks nice, but sometimes tends to curl up around the shower because of moisture. Some tile above the surround will help this as well.

To start, I removed the wall paper down to the drywall. The tile I was installing were 4" x 4" squares that matched the tile I would be laying on the floor next. The homeowner had picked up a handful of accent tiles that I staggered around the surround.

The result was nice, but will be even better when I get the floor done, and that's coming soon!
-Peter

Tuesday, April 20, 2010

A Tumbled Marble Backsplash Spices Up This Kitchen

Sometimes a kitchen can be quite nice and still lack a little 'wow-factor'. It was time to add some of that to this kitchen with a new tumbled marble backsplash.

The homeowners have great taste and had picked out a handful of various tiles that they liked. We talked over the layout and tried a few combinations before coming up with the final design.

The bottom 6" features a mosaic pattern made up of various shapes and colors of the stone. Above that I would use 4" square tumbled marble set on the diagonal. I was excited to get started.

The backsplash tile can be installed right over the drywall, provided that it is smooth and not damaged. This saved some prep time and I jumped right into getting the layout right. With this many different tiles involved it's tricky to not end up with small pieces of tile somewhere in the layout.

I laid the tile out on the countertop with spacers to get an idea of the design and measure the actual size of things. Then I installed the mosaic tile all the way around. It actually came on a 12" x 12" sheet that I cut in half. The slowest part is always cutting all those pieces that go around the outlets.


With the bottom tiles ready, I started laying out the top tiles on the diagonal. The second row of 4" tiles would alternate between the natural white and a chocolate-colored tile to add more interest. I wanted this to lay out so that the spacing of the accent tiles would not look awkward.

I used a sanded grout to finish it up. This is recommended because even though some of the joints are 1/8" or less many of the spaces are much larger because of the rough, uneven edges of the tiles. I sealed the tiles with two coats of sealer before grouting which is supposed to help the grout not get absorbed into the face of the tiles as much.

In the end, the backsplash looked remarkable and the colors blended perfectly with the maple cabinets and the solid surface counter.

-Peter

www.CarpentryGuy.com

Monday, April 12, 2010

Tile and Finish the Shower Floor Repair

I covered the basics of waterproofing a shower using the Schluter Kerdi system in my last post (click here). Now it's time to lay the tile and grout it all.

The goal of this project was to just to replace the bottom rows of tile and the shower floor. The older system was leaking and needed to be torn out (see this post). In addition to leaking, the old tiles weren't looking very good and some dirt had been collecting in areas that had been caulked several times in an attempt to fix the leaks.

The layout for the tile was already dictated to me by the original tiles that I didn't remove. I would be using a rounded base tile at the intersection of the bottom of the wall with the floor. This piece would get cut to fit after I installed the wall tiles.

In this case, I would need to start laying tile at the top and go down from there. If you start at the bottom, the weight of the tile is supported by the floor. Starting at the top, I had to tape each piece to the tile above so that they wouldn't slide down the wall and out of place.

One great thing about the Schluter Drain is that is a 4" square. It's perfectly sized for most tile installations where you are using either 1", 2", or 4" tiles. In my case, I installed 2" square white tiles by cutting out the center of one sheet of tile and installing this first (see the picture below). Then I installed all the tile sheets around the perimeter.


The small ledge across the bottom of the doorway is called the curb. It keeps the water contained in the bottom of the shower. I used some curved edge pieces of tile on the corner of the curb to avoid any sharp corners.

After grouting with white unsanded grout and sealing, this shower was ready for business. Hopefully, it will last for decades to come with no more problems.

HINT: John Bridge (Tile guy extraordinaire at www.JohnBridge.com) says that for a maintenance-free shower, take a minute after each use to wipe down the tile with a towel. This will greatly reduce any mildew over time and keep it cleaner as well.


-Peter


www.CarpentryGuy.com

Tuesday, March 23, 2010

Open Up The Kitchen Please!

Sometimes the biggest changes to your home aren't the most expensive. For example, you could spend $10k remodeling your kitchen and upgrade everything and still feel cramped in a small room. For these homeowners in the Brentwood area, their budget was much lower, but the change was remarkable.

The split-level home was built with a kitchen wall that divided the kitchen from the living room. The problem was that the wall seemed to 'stick out' and make the rooms feel too divided. The homeowners also wanted more room for setting up a large dining room table for family gatherings. The solution was to remove part of the wall.


Unlike a couple of my other recent projects, this wall was load-bearing, supporting the ceiling joists from the two adjacent rooms. This meant that I would have to carefully build temporary walls along each side before tearing out the old framing and putting in a beefy 2x10 header. The header would extend all the way across the space to the outside wall. To save a little money, we decided to leave the header exposed and covered with drywall than to cut out ceiling joists and conceal it in the ceiling.


There was very little trim to do because I finished all the edges with drywall, however, I did make a small shelf for the serving window out of nice piece of 1x6 poplar. I notched the ends so that the board would seem to extend wider than the opening and give the effect of a window sill.


After removing around 32" of the wall, there was a little bit of hardwood flooring to patch in. It's always tricky to match the color of 50 year old hardwood floors perfectly, but this one seemed to blend in well with a coat of "natural" stain on some red oak.

The change made an incredible difference in this kitchen which now seems more integrated into the living room and ready for family!

-Peter

Monday, March 15, 2010

Inglewood Cottage Kitchen- Before and After

The kitchen at my Inglewood Cottage project needed some creativity to get to the shape it's in today- fabulous!!

(Professional photos by Zach Goodyear.)

Here are some of the challenges that were overcome:
1. Open the wall up between the kitchen and dining area and make it an arch to match the other doorways in the home (this post).
2. Make a spot to install a dishwasher next to the sink (this post).
3. Add counterspace on the wall next to the range where there previously was none.
4. Build a cabinet next to the dishwasher and over the range to hold the new hood (this post).
5. Level the floor around the back door (this post).
6. Make it all look like it fits with the character of the house.

I'd say we accomplished our goals.


The old kitchen had some good parts, namely, the cabinets. They were build to last and there was no reason to replace them. Instead, everything else is new- floors, counters, backsplash- but the cabinets just got some fresh paint and new hardware. Actually the cabinets are probably better built than many of the budget cabinets available today.

The subway tile backsplash is one of my favorite parts of the renovation, as well as the cabinets I got to build for above the range and next to the dishwasher. Nothing fancy, but it was fun to build a new cabinet and try to make it match the old so well that you wouldn't think it was new.

In addition to the cosmetic changes, the kitchen also got all new wiring and plumbing. It's ready for business!

By the way, when we got finished the homeowners listed the home for sale on a Friday and had it under contract before the open house on Sunday! Wow! I new it would get some attention, but that's an amazing story, especially in our current real estate market.


Check out all the articles related to this project at this link.

-Peter

Sunday, March 14, 2010

Inglewood Cottage Bathroom- Before and After

The project that I'm calling my "Inglewood Cottage" project has wrapped up and I wanted to feature a few before and after photos. Most of my work on this project was focused on two different rooms, the kitchen and bathroom. Let's look at the bathroom transformation first.

Professional photography (right) by Zach Goodyear.

This bathroom was nearly completely redone, however, most of the walls did not need to be gutted. However, I needed to remove quite a bit of the walls just to get that old cast iron tub out of there! The new surround was custom fit to go around the existing window that will let in natural light even though it will need to be covered with a curtain when showering.

When I started, there wasn't much appealing about this room. It did have a huge cabinet behind the door which we left alone and painted. Otherwise, all the fixtures had to go as well as the deteriorating vinyl flooring.

By the time I was finished, the bathroom had a lot of my favorite details- wainscoting, pedestal sink and small floor tiles. The black and white tiles turned out great and really fit the period feel of this room. In a room with so much white trim, the black tiles add some interest and are a highlight of the bathroom.


This bathroom is quite different than when I started and that's a very good thing! I really enjoyed being part of the changes in this small, but popular room of the house.. :)

See all the related posts to this project at this link.

-Peter

Saturday, March 13, 2010

Tile for the Inglewood Kitchen

It's been a while since I wrote about the Inglewood Cottage project. I finished my part to let the homeowners get everything painted before they put it on the market. I wanted to wait until after they were finished to get some final pictures.

Somehow, this home from the 1940's has retained much of it's character by still having the original hardwood floors and even the unpainted trim and doors. (A rare thing in this part of Inglewood). To continue the character into the remodeled kitchen, the homeowners wanted me to install a white subway tile backsplash and a ceramic tile floor.


When I got to it, there was an old backsplash made up of 4" off-white tile with a laminate counter that had actually been installed right over the top of the original countertop! I took it all apart and installed the new high-grade laminate counter (see this post) over the new dishwasher and custom cabinet that I built to fill it out. (see this post)

The new flooring tiles are 12" glazed porcelain, but they have the look of marble. I think it's a nice look for this older home. Part of the floor had to be leveled before tiling (see this post) and that turned out great.

-Peter

Friday, March 12, 2010

Open Up My Kitchen Wall- Before and After

When I started, the kitchen and dining room were two separate entities, now they are combined into one open space joined by the fantastic maple countertop that rests on the new half-wall in the middle.


I say it all the time, but I enjoy projects like this that really transform a home and add to my client's lifestyle.

See all the articles related to this project here.


Now, on to the next project!

-Peter

Monday, February 8, 2010

Upgrade to a Double Sink Vanity

My most recent project was to help a family with some work around their beautiful older home near Sevier park in Nashville. The home was renovated a few years ago to include many modern upgrades including a small upstairs bathroom.

The bathroom was nice before, but it services three upstairs bedrooms and the homeowner wanted more capacity to keep up with their growing family.


When I started it had a pedestal sink and a small mirror that was hung to low to see your face without bending over. It was also quite dark and needed more light. On top of these things, they needed an exhaust fan to get more of the humid air out.

The solution for this homeowner was to add a double vanity. (And a bath fan, three lights and two bigger mirrors... :)

Adding a double vanity is a little more complicated than just replacing a sink. Often, each sink needs a separate drain pipe and supply lines instead of just one set for a pedestal sink. Thankfully, there is a small attic access panel in the closet that lets me get behind the wall with all the plumbing in it.

In addition to adapting the plumbing, I moved the wiring and added a couple more lights on either sides of where the mirrors would be located as well as adding a high powered, yet quiet, exhaust fan that will help get the moisture outside through a vent in the roof.

After a few days of work, this smaller bathroom was bright and ready to handle more customers. Of course, at this point, most of them are still under the age of two...

-Peter

Friday, January 29, 2010

New Tile for Two Bathrooms- Before and After

At the beginning of the week I started a new project replacing the flooring in two bathrooms with tile. When I started, there was some 4" white tile in the wet areas around the shower and toilets. The rest of the rooms was carpet. The homeowner wanted it all replaced with new tile and I was happy to help her out with that.

After removing the old flooring I installed 1/2" Hardibacker throughout each room over a layer of modified thinset. This gives us a good foundation for the tile to rest on. I also removed all the baseboard and shoe moulding which would be replaced later as well.

I installed 13" tiles in the larger master bath. They are 'glazed porcelain' tiles which is a type of ceramic that has a glazing that makes it repel stains very well. As you can see in the picture there are quite a few angles and cabinets in the master bath to work around. Around cabinets I try to cut the tile so that I leave a margin between the cabinet and tile that's approximately the same width as the grout lines. Then, I grout this to match the rest.


With all those different items to tile around, I spent some time upfront to consider the layout so that I would minimize the small pieces around the perimeter. I always try to stay away from having pieces smaller than half a tile if I can help it. This layout worked out great with the only small pieces being behind the toilet where they won't be seen much anyway.

I also re-tiled the guest bathroom down the hall. It was much smaller so I used a 6 1/2" tile that matched the tile in the master. I think the smaller tiles feel more appropriate for a smaller room like this, but I guess it's just a personal preference.


It was fun to see the transformation in these rooms. I was quite happy with the result.

-Peter

Wednesday, January 20, 2010

Apartment Kitchen Before and After

This project has been complete for a while, but I thought I'd post some of the pictures showing the transformation from a den to a kitchen for this downstairs apartment.

To separate the living areas and make room for the kitchen, we would need to remove the stairs and close up this wall. This would be where all the plumbing and new electrical would be located.

It's an apartment, so there's nothing too high-grade here. The floor is tile and the counters are stock-laminate. Even using fairly basic cabinets and materials, the end product is quite nice, especially compared to a lot of the other places out there for rent.


Here's an interesting picture after we had removed the stairs and were ready to start framing the new wall. We saved all the pieces so that the stairs could be put back together someday if it was needed. (Someone will be thankful for our consideration, I'm sure.)

Just for fun, I sketched the kitchen out using the design program from IKEA. I didn't end up using any IKEA products, but this helped me get a good idea of how everything would fit together. Read more about that here.

-Peter

Monday, January 11, 2010

Installing Sliding Glass Patio Doors

This great home in East Nashville has had quite a few updates including a laundry room on the back of the house. It's a nice addition complete with glass doors that let it lots of light. The problem is that the door swings into the room and competes with the washer and dryer for space. The old door is also had some water damage over the years.

The homeowner called me to replace the entire thing with a new sliding glass patio door that would seal better to keep out the elements, and not swing into the room when it was opened.


The main issue to consider is the size of the opening. Thankfully, the old doors fit in a 60" opening and this is a standard size for patio doors.

I started by carefully removing all the trim inside and out to reveal the door jamb. I saved the trim to reinstall around the new door. With the trim off, I could cut around the door jamb with a reciprocal saw to sever the nails and get the entire piece out as a unit. Now I could inspect the framing and see what I was dealing with.

(This is the moment where you have a big hole in the side of your house and you wonder if you really know what you're doing... :)

The new door had a vinyl frame with 'fins' that stuck out from all the sides. The fins get attached to the framing to secure the door. For that to work, I needed to have less than a 1/2" gap around the door, so I added plywood filler where necessary. To get the threshold at a good height to match the tile floor in the laundry room, I also needed to raise the bottom of the door up around 3/4".


After making sure the door was level, plumb, square, and lookin' good I shimmed it attached it with screws all the way around.

The next step involves sealing the perimeter of the door with a product called "flexible flashing". You can get it in rolls of various sizes. It's used to provide a moisture/vapor barrier around doors and windows. It's installed over the fins to cover up the screws and make it harder for moisture to get around that door.

Re-installing the trim should be an easy job, however, the new door is hardly ever the exact same dimensions as the old one. Thankfully, the new door was a little bigger, so I could make adjustments to the exterior trim and reuse them. The inside was harder because the patio door wasn't as thick as the old one. I had to rip a 3/4" board into 1" strips to fill around the door and then add casing over that.

Some caulk and paint, and this door is ready for business.

-Peter

Wednesday, November 25, 2009

Open Up The Kitchen Wall

After seeing the results of one of my recent projects where I opened up the wall in one of their neighbor's kitchens (this project), these homeowners decided to have me do the same to their home. It's always a rewarding project when you get to be part of such a dramatic transformation in such a short amount of time.

This a newer neighborhood so the homes, although somewhat different, are built with nearly the same layout, making this job very similar to the other one that I did. This was NOT a load-bearing wall, which helps speed things up and saves a little money as well.


The countertop was made by my friend Chris Barber over at Barber Woodworking. It's made out of red oak and stained with an "Early American" stain color to nearly perfectly match the cabinets throughout the kitchen. As always, Chris does great work and created a wonderful centerpiece for this entertaining space.


In this picture you can see where Chris was scribing the end that would butt up to the wall so that he could cut it to fit perfectly. He used the same bolting system as last time to secure the countertop to the framing. (See this post.)

I also installed three art-glass pendant lights that not only provide a lot of light to show off the new countertop, but also bring out some of the homeowner's character in the project.

With a Thanksgiving gathering coming up, I'm sure these clients will enjoy sharing their transformed kitchen with friends and family who will gather there.

-Peter

www.CarpentryGuy.com

Monday, November 23, 2009

The Office that Was A Garage

We passed our final inspections and I wanted to show off some pictures of a recent project that involved changing an old garage into new finished space that's slated to be an office.

When I started the uninsulated walls were covered with 3/4" boards and the floor was very rough concrete that was far from level. After gutting the walls to the studs it was time to pour a new slab to level the floor and add a back patio.


The room also held all the laundry facilities and service panel, so the idea was enclose all of this in closets to hide the mess while still keeping it easily accessible. I framed in the walls and had John Dorn Electric come out and do all the updated wiring. I also insulated all the exterior walls and the attic.


In addition to moving the door over to make room for the utility closet, I added a large front window that I found at a salvage yard. It was quite a find because it fits in naturally with the other older windows in the house. It even had the old counter-weights intact. The Jeld-Wen casement window on the end of the home and the fantastic solid-wood back door were also treasures from the salvage yard.


After a week of drywall work it was time to add trim from top to bottom. The small shelf that runs along the lower part of the wall covers the old concrete block that was at the base of the garage walls. I also added crown moulding and baseboard to match the interior of the home.

Before I was done I also added some tile around the back door where the floors will get the most wear and tear.

It was an fun project because of the variety of parts that came together to create this new space for the homeowner. She also had the house painted while I was there, so the changes were that much more dramatic, inside and out.


With an additional 200+ square feet, finishing this space added around 25% more living space to this cozy little home in East Nashville. It was my pleasure to play a part in the changes that will be enjoyed for decades to come...

-Peter

http://www.carpentryguy.com/