Same guy- new name - new website!

You will be automatically redirected to the new address. If that does not occur, visit
http://InspiredRemodeling.com/blog
and update your bookmarks. Thanks! -Peter

Showing posts with label Eastside Bungalow Project. Show all posts

Tuesday, March 31, 2009

Fantastic Fireplace Facelift

Everyone loves before and after stories, so I thought I show some pics of the fireplace at our East Nashville project. We started with the common story- broken & cracked tile, overpainted mantle and bland.

When we were done it was one of my favorite parts of the house, even though the fireplace wasn't functional. It was still a nice centerpiece to the living room.

We started by removing the mantle. At first I thought we could strip and stain it, but after getting started, I'm not sure that the wood was worth the trouble. I used my wood scrapers to clean out much of the paint and get it looking sharp. After sanding we painted it with the brown trim paint that was an accent color for the house. (I love that color, but you don't want to overdo it!)

The tile was the really fun part. The old wall tile came off in huge chunks. I built a new support system for them with 2x4s and cement board. This was tedious because the depth had to be exactly right so that once it was tiled the mantle would fit over it right with no gaps.

The hearth was easy- I just filled in the holes with floor leveling cement and tiled right over the old tile. This made a new surface that was raised a bit from the floor, but that was fixed by adding some trim around the edge that was stained to matched the hardwoods.

I found this incredible tile at the Habitat Store in a mixed lot. I had been saving them a long time waiting on just the right project to use them on. They are Italian ceramic tiles in different sizes. I tried a few different patterns until one worked. I used smaller squares around the outside and put the larger 12x18 rectangular pieces for the hearth.

You can't use it to burn anything except candles, but it looks great.

-Peter

www.CarpentryGuy.com

Friday, March 27, 2009

Basement Retaining Wall Repair

Old homes are notorious for having basement and crawlspace problems. Most are related to water entry for various reasons. Our East Nashville fixer was no exception. It had a basement window on the side of the house where water was definitely getting in and eroding the basement walls, which were just dirt. From the picture you can see how bad it was around that window.


Basement & Crawlspace problems usually have a two-fold solution:
1) Stop the problem from getting worse
2) Repair the damage

If you do one without the other, you'll still have problems.

For our situation, the fix involved first diverting the water from the house by re-grading the outside and build up the window-well a little better. Then we could work inside to re-support the structure in the weakened area.

The grading was easy- I had my cement guy do that when he was regrading the backyard. For whatever reason, the yard was sloped toward this window. We added some bricks to make the window well a little taller and then graded the yard so the water would run away from the house. This seems obvious, but there are tons of houses out there with this exact problem!

My job was to handle the inside repairs. My plan was to build a block retaining wall to support a couple short jack stands. A short wall was already present so I would just extend it up. The new wall would then carry most of the weight since the outside wall was damaged.

I filled behind the wall with concrete all the way up to the foundation so that the dirt wall would be supported and the foundation wouldn't move anymore. Then, I replaced the window covering with new plywood and caulked it well. In the end, it looked much better and was quite dry the next time it rained.

Dry basements are a good thing.
-Peter

Monday, March 9, 2009

Cleaning & Exposing Brick

As I started gutting the kitchen we discovered a long forgotten brick chimney in the corner. Originally, the chimney was built to vent some kind of cook stove, maybe coal-burning. It was later covered with plaster and cabinets to hide it completely.

Even a little exposed brick in a kitchen looks great so we decided to clean it up and show it off. I chipped off the big pieces, but there was still quite a bit of plaster residue left to remove. There are lots of differing opinions on the best way to do this. I decided to try muriatic acid to clean off the plaster remnants. I found it at Home Depot, but they only sold it in huge amounts.

I took every precaution I could: large box fans to keep the air venting out the window, protective gloves and safety respirator with replaceable cartridges. (DISCLAIMER: get professional advice for your specific use if you are considering trying this. Various brick types may react differently to the muriatic acid.)

The recommendations that I found were to use about 1 part muriatic acid to 9 parts water (or 10% muriatic acid solution). In the end I probably mixed it a little stronger, but it worked great.

I bought a really cheap disposable paint brush to apply the acid solution and a stiff-bristled wire brush to help clean as well. Just be careful not to splash any of the solution on any unprotected services. I did it when the room was gutted so there wasn't much I could hurt.

I had to do the treatment twice because after the first round the brick still had traces of plaster. I was also doing a very small amount of the chimney because most of it would still be covered with cabinets.

I gave the chimney a day to dry really well and then applied a low-lustre sealer to hold in the remaining dust and protect it from any food stains, etc. (It was near the stove)

It was a little tricky to layout the cabinets & countertop to compensate for the chimney but it was well worth the effort. Here's how the kitchen turned out:


-Peter

www.CarpentryGuy.com

Sunday, March 8, 2009

Master Bedroom Redo

In our first home, a challenging fixer upper in East Nashville, we faced many issues that are quite common to homes that were once neglected duplexes. For example, there were suspended ceilings like you have in an office building throughout half of the downstairs. Above the ceiling tiles were pipes, ductwork, and hidden cracks in the plaster.

The master bedroom was a great example of how unattractive it was, although this picture doesn't show the suspended ceiling or the large stains in the hardwoods. Everything was painted a dirty white color, which I suppose is better than dark pink...


The former closet didn't extend to the ceiling, there was just a flat surface above it that could be used for storage. Sounds nice, but it looked weird and made it really obvious that the closet was not an original feature of the home. I wanted to finish this out with some nice doors to access the storage space and add a small shelf to display knick-knacks or whatever.

I also installed Crown Moulding throughout the downstairs and built soffits to enclose the drainpipes for the upstairs bathroom.

The closet itself wasn't built with any doors on it to hide its contents. I wanted to install bi-fold doors so I built a post in the middle to separate his/hers closet space and trimmed it to match the rest of the doorways. That was fun. I also installed a switch and some low voltage lighting so that the closet wasn't so dark.

Here's a final picture showing all the goodies:


I love seeing old homes come back to life.

-Peter

www.CarpentryGuy.com

Wednesday, February 25, 2009

Birth of a Carpenter

I thought I'd start a blog to document some of the projects I've worked on and give me a place to rant about anything I want, mostly related to home remodeling.

Though I learned a few things growing up on a farm and using tools from a young age, the real experience came when my wife and I made the decision to buy a fixer-upper in East Nashville as a starter home. This was before East Nashville was so expensive and we bought the ugliest house on Eastside Ave.

It was somewhat overwhelming, but we had to dive in because the roof needed to be repaired. I bought a book at Home Depot to guide me but was still hesitant to start ripping shingles off. Thankfully, my wife, Stephanie, coaxed me ahead and said I could do it.

I'm glad she did. The roofing repair went great and helped me build the confidence to try another remodeling baby step. (Yes, I was the crazy guy on the roof trying to finish after dark with work lights blazing... :)

It wasn't long afterward that I had my building permit in hand and we were gutting the upstairs. The plan was to finish upstairs first, then live there while we did the downstairs.

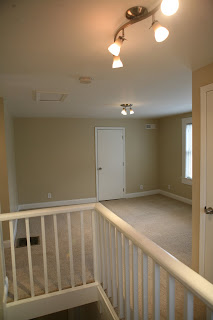
When we started, the walls looked like someone had glued paneling to the walls and then ripped it off. The floor was covered with carpet squares that were glued to the floor. We moved the doorway a little so you no longer had to go through the bedroom to get to the bathroom. I also updated all the wiring and plumbing.

Upstairs Room Before & After...

My wife was due with our first child so we made record time! We started in November and had finished the upstairs in May just before Noah was born June 2nd. Whew!

More on this project later,

Peter