Same guy- new name - new website!

You will be automatically redirected to the new address. If that does not occur, visit
http://InspiredRemodeling.com/blog
and update your bookmarks. Thanks! -Peter

Showing posts with label Stairs. Show all posts

Thursday, March 18, 2010

Now for the Oak Steps

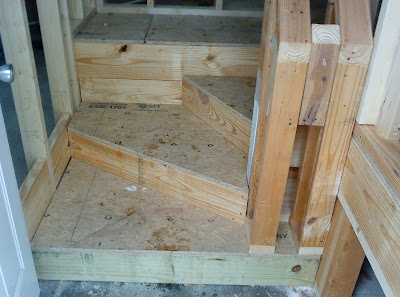
When I added a bathroom to this home in Donelson I raised the floor from the den to match the rest of the home. That meant that there would be three steps to build going to the den (see this post).

The homeowner has decided to have me add hardwood flooring to the hallway, but before I do that, I need to install the oak treads and risers on the steps.

There's usually a section at the home stores where they sell all kinds of stair parts like the treads, risers and balusters in basic red oak. That would have worked fine, except that these steps were 51" wide.
To find the wider cut treads and risers I went to JeffCo Flooring downtown. It's the super-secret place where the pros shop for hardwood flooring, including stair parts. They had just what I needed.


I started with the bottom riser and worked my way up. These steps will not have any trim on the sides to cover any gaps so I had to be exact with my measurements. I usually cut the pieces a little long and trimmed it to make sure it fit well. I put it all together without any fasteners and then took all the pieces outside for a good sanding.

Some people finish the wood before installation, but I like to install them before I finish. After a healthy dose of liquid nails, the treads were nailed in place with the risers. The top step gets a piece called stair nosing that is rounded on the front, but the back has a groove where the end-tongue from the flooring will fit. The stair nosing is sold by the foot, so you can just buy as much as you need.

I put a little painters tape on the wall to keep from making much of a mess and then applied the stain. These steps were stained with a Minwax color called "Natural". It's nearly the same as just using a clear coat, but I thought it was a slightly better match to the pre-finished red oak flooring that the homeowner wanted to install in the hall.

Letting it dry overnight and lightly sanding between coats, the steps will get two more coats of polyurethane after this stain.

Next comes the hardwood flooring...

-Peter


Sunday, February 21, 2010

Winder Stairs- Finish With a Handrail

When you're framing the stairs, it's worth giving some thought to the handrail.

Often, the handrail can be attached to a wall, so this is the time to add some blocking so you have something solid to attach it to- in the right place.
In my case, I've got a wall, but this is a winding stair, which complicates things.
For this particular project. I decided to frame in a short wall which rises around 30" above the front edge of the treads which will be covered in drywall with a handrail attached on top.


The difficult part to this is getting the angles right. As I mentioned in my post about the layout (here), the narrow end of each tread is 6" across. With a 6 1/2" riser, we know that the angle will be close to 45 degrees. I found that a 48" miter worked for me.

My idea was to treat this similarly to a newel post that might have a handrail coming into it from one direction and then continuing on from another side in the new direction.

-Peter

www.CarpentryGuy.com

Friday, February 19, 2010

Winder Stairs- Build the Treads

Yesterday, I wrote about how I did the layout for my small set of winder stairs (this post). Now, let's talk about how I built the treads.

Often, you can build the treads as a series of platforms and then just stack them and secure them in place. I'm going to frame each one individually, frankly, because I didn't have enough extra plywood to make the platforms... :)

Before proceeding too far, of course, I needed to consider the height of each riser. The total rise of my stairs was 26" so each step would be 6 1/2" high.

The risers would be made from 2x8's and be the frame that supports the 3/4" plywood treads. To achieve this height I ripped each of the 2x8's to 6 1/2", except for the bottom ones that were 5 3/4". (The bottom of the stairs is always thinner by the thickness of one tread)

You can see the progression in the pictures as I framed each step from the bottom up.


One of the more challenging (and fun) parts of this was getting the angles right. Most of the angled cuts were 30 degree miters, with a few 15 degree ones involved with the middle step.

All of these treads are secured to the surrounding framing, with blocking added where necessary to secure everything. The treads are nailed to each frame after on a bead of liquid nails to seal everything together.

Next, I'll add an interesting handrail...

-Peter

www.CarpentryGuy.com

Thursday, February 18, 2010

Winder Stairs- Layout First

Raising the floor in the new bathroom meant that we would need 3 steps down to the landing at the backdoor. The problem was that there wasn't much space to work with. We needed to use the minimum footprint as possible. We also needed to make a turn to guide the user up into the bathroom to the right. This meant that a 'winder' stairway would be needed.

A winder stairway is basically defined as a stairway whose sides are not parallel. There are different codes that cover these stairs to keep them safe. Let's start this project by looking at how to layout this simple winder.

TIP: Need more info about all the code requirements to building great stairs? Check out this "Visual Interpretation" of the code from the Stairways Manufacturers' Assosciation. (Click Here)
1. I started with a large piece of plywood that I would be using to make the treads. I drew a square in one corner that was 36" on each side. My winder would end up being 36" deep, but 41" wide at the bottom step. Still, I started the layout by using a 36" square.
2. Draw a diagonal line from one corner to the other. (A black line in the picture) Then make a mark 18 3/4" from each corner on this line.
3. Draw two lines from another corner through both of these marks you just made. (The white lines in the picture.) By doing this you have outlined each of the three treads for the steps.
You'll notice that the narrow part of these treads is very small. Sometimes you'll see an old staircase that uses the treads like this. Of course, this is quite dangerous because there's not really room to place your foot making it more likely to slip and fall. So, the codes now say that the tread shouldn't be less than 6" wide at its smallest point.
4. Draw a line, square to the edge of the first step, at the point where the tread is 6" deep. Continue marking the other steps at this point as well like I did in the picture. Cutting this out can present a problem if you're turning a tight corner like I am. Often you can make a long turn around a corner but in my case I'm going to build a short wall in this place to support the required handrail. We'll get to that soon enough.

5. With the basic treads laid out, I wanted to consider the actual dimensions of my stairway. Mainly, I needed to make a new line at 41" wide because that's how wide my stairs are at the bottom.
6. Go ahead an cut out the treads. These will be the guide for building the platforms that will hold them. Let's cover that tomorrow.

-Peter


Tuesday, February 16, 2010

Adding Some Steps Into the Den

In conjunction with raising the floor to add the bathroom to this home, I would need to build some new steps at the end of the hall leading down into the den. For stairs, this is about as basic as you get. Walls on both sides with no turns or obstacles to consider.

With any stairway, I need to spend some time doing math before I start cutting any lumber. There are some basic guidelines to building steps and I covered them more thoroughly in this post.

The height of the new floor dictated that I would need 4 steps, each one with 6 1/2" rise. This is comfortable height so that works great. I would make each of the treads 11" deep.

I cut three stringers out of treated 2x12 boards. I fit them in place to test the fit before I nailed anything. Using a level, I could tell that the concrete floor wasn't quite level making one of my stringers higher than the others. To fix this, I shave a little extra off the bottom of the stringer and added shims where needed. In order to have level steps I have to have level stringers!


After the stringers were in place, I added some cross supports to add more strength under the treads that would be plywood and possibly covered with carpet later. I also applied a bead of Liquid Nails Adhesive before nailing the treads down. All of this helps to prevent squeaks later and give the homeowner a solid set of stairs.
Next we'll work on a set of winder stairs... stay tuned!

-Peter

Tuesday, October 6, 2009

Add Some Simple Steps

After leveling the floor with a new cement slab (this post) and framing the wall to enclose the laundry area (this post), it's time to build some stairs to get into the room. Long before we can start building, we have quite a few things to consider to get our stairs right.

I won't cover every single aspect of stair building. Frankly, I still have a lot to learn myself. Let's go through some of my thinking for this particular project:

Have a Landing or Not?
Building codes require a landing at the top and bottom of each stairway. It has to be underneath the side that the door opens. In our case, if the door opened into the room, we would need a 36" deep landing, making our steps reach nearly 6 feet into our room. Instead, we planned to install a new door that would swing into the kitchen. In this way, the kitchen floor acts our 'landing', so we wouldn't need another one inside the new room.

The next thing to figure out is height of the risers and the depth of each step.

Risers
For this I measured the total rise of the stairs, or the distance from the cement floor at the bottom to the finished floor at the top. In my case that was 27 1/2". Codes say that the maximum rise for a step can be 7 3/4" This means that we'll need four steps of 6.875" each or 6 7/8". (27.5" total rise divided by 4 steps)

Treads
There are lots of opinions out there on how to figure out tread size. One rule of thumb that I've read says that two risers + one tread = 24 or 25 inches. Another formula I saw says that the tread + riser should equal 17 to 18" and a tread x riser should equal 70 to 75". Digesting all of this, I decided to make my treads 10 1/2" deep.

So, if you're hanging with me, it's time to layout our stringers on a 2x12 using these two dimensions. You can see in the picture how mine looked before I cut it. Use a framing square to make the marks and double check to make sure you are as exact as possible in your measurements.

Cut out the stringers. Then, cut the thickness of one tread off of the bottom of the stringers. This way, once you add the treads, the height will be the right distance from the floor.

Check the stringers in place with a level and make sure everything looks right before you nail them in place. For my project, I first attached a plate to the floor that would go across the bottom of the stringers to secure them to the floor. I made a notch at the bottom where the plate goes.


After securing the stringers, I had to frame around a valve on a gas pipe that would need to have an access hatch added as I finish the stairs out.

We're almost there now...
My stairs are a little wider than the typical 36" so I added some extra cross pieces to support the treads that would be 3/4" plywood. Starting at the bottom, I added 3/4" boards as risers, ripped to 6 7/8" wide. Then I added the treads cut 11 1/4" wide, overlapping the riser on the step below. After adding the next riser, the tread will be 10 1/2" just as planned.

These are just the basics. For a better understanding of stair building, I'd recommend a great book on framing called Ultimate Guide To House Framing by John D. Wagner. The book has an entire chapter devoted to stair building and goes into quite a bit of detail that may be helpful if you'd like more info.

Schools over. Time for recess... :)

-Peter

www.CarpentryGuy.com