Same guy- new name - new website!
You will be automatically redirected to the new address. If that does not occur, visit
http://InspiredRemodeling.com/blog
and update your bookmarks. Thanks! -Peter
"Peter did an incredible job on our latest renovation. We are so excited about how he opened up our kitchen/dining room area! Its exactly what we wanted. His quote for price and time of completion was spot on. We will definitely call Peter for future projects and highly recommend him to any one looking to update their home." -Ryan & Daniela, Nashville
"We couldn't be happier with the work Peter has done for us! We had delayed a home improvement project because some past experiences with people we hired left us feeling anxious, and we just didn't want the hassle. However, Peter really put us at ease right from the start! Not only is he creative and skilled at his craft, but he is also extremely professional, courteous and trustworthy. He always took the time to answer our questions and really paid attention to the details that were important to us. We will definitely call Peter again, and we would recommend him to anyone." -Kassie & Andy, Mt. Juliet
"Peter recently converted my attached garage to a beautiful new office space. I was recovering from a major car accident and really didn't have the ability to oversee the work. Peter completely took charge, coordinating and ensuring quality of his own work and that of subcontractors. He even selected all the fixtures, doors, and windows completely to my taste since I couldn't shop. He worked creatively and efficiently and was on time and budget. Peter has a great attitude and is very communicative in person and on his blog. Living in a 1930's home by myself, it gives me great comfort to know I can call Peter, whose skills and character I can trust." - Aynsley, East Nashville
“Recently, Peter put in a new tile floor in our kitchen and dining room. I couldn’t be more pleased with his workmanship. The floors look great and the work is as professional as any I’ve seen. My wife and I are so pleased with his work ethic that we’ve asked him to take on some other projects for us. He definitely gets a thumbs-up from me.” -Gary Phillips, Nashville
"Peter does excellent work and I would hire him again without reservation. His assessment and quote of the project was accurate and competitive. The job was started and completed on time. While he was working, he was always very professional and neat. The finished product exceeded our expectations. All in all, it was a great experience and I would recommend him to anyone.” -Justin, Inglewood
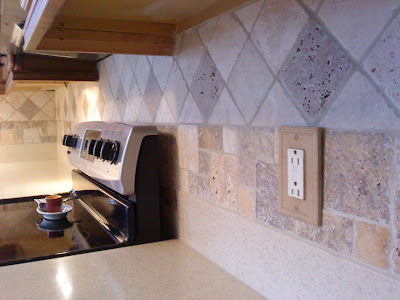
The bottom 6" features a mosaic pattern made up of various shapes and colors of the stone. Above that I would use 4" square tumbled marble set on the diagonal. I was excited to get started.The backsplash tile can be installed right over the drywall, provided that it is smooth and not damaged. This saved some prep time and I jumped right into getting the layout right. With this many different tiles involved it's tricky to not end up with small pieces of tile somewhere in the layout.
I laid the tile out on the countertop with spacers to get an idea of the design and measure the actual size of things. Then I installed the mosaic tile all the way around. It actually came on a 12" x 12" sheet that I cut in half. The slowest part is always cutting all those pieces that go around the outlets.
With the bottom tiles ready, I started laying out the top tiles on the diagonal. The second row of 4" tiles would alternate between the natural white and a chocolate-colored tile to add more interest. I wanted this to lay out so that the spacing of the accent tiles would not look awkward.I used a sanded grout to finish it up. This is recommended because even though some of the joints are 1/8" or less many of the spaces are much larger because of the rough, uneven edges of the tiles. I sealed the tiles with two coats of sealer before grouting which is supposed to help the grout not get absorbed into the face of the tiles as much.
In the end, the backsplash looked remarkable and the colors blended perfectly with the maple cabinets and the solid surface counter.
-Peter
www.CarpentryGuy.com
HINT: John Bridge (Tile guy extraordinaire at www.JohnBridge.com) says that for a maintenance-free shower, take a minute after each use to wipe down the tile with a towel. This will greatly reduce any mildew over time and keep it cleaner as well.
It's a fairly new system for waterproofing showers that involves installing a membrane (the Kerdi) throughout the shower and over their special Kerdi drain. When finished you'll have a completely waterproof, sealed shower. In fact, it's so waterproof that you can install the Kerdi right over regular old drywall. That says a lot.Let's look at how I installed the Schluter Kerdi shower system when I was repairing and old leaky shower pan liner that was decades old. In my last post (this link), I tore out the old tile down to the framing. Next, I replaced the subfloor with new plywood and added 1/2" Hardibacker on the walls. (Yes, I could have used 1/2" drywall, but I had the Hardibacker on hand...)
INSTALL THE PRE-SLOPED SHOWER TRAY
The older method to doing a shower floor included making a sloped bed of mortar that would direct water toward the drain. This needed more time, labor and expertise. For this shower, I used a Schluter pre-sloped shower tray. It's made out of some kind of foam and is easily cut to fit your particular shower.
After cutting the tray to size, I dry-laid it in place to mark the spot for the drain. Once the drain hole was cut out, I covered the floor with unmodified thinset mortar using a 3/16" v-notch trowel. The shower tray sets in this. You can walk around on it to make sure it's well embedded in the mortar. Just be careful not to crush it with your knees as you are working- it is foam after all.
INSTALL THE KERDI MEMBRANE
I'm not going to go through every detail of installing the membrane. If you are interested make sure to get the Schluter installation DVD and check out www.Schluter.com. The DVD comes with the shower kit and is great at showing every step along the way.
Basically, the membrane is installed over a thin layer of mortar and then flattened out and embedded using the straight edge of your trowel. The edges must all overlap by a minimum of 2". I started by using something they call Kerdi-Band in all the bottom corners. (It's just a thin pre-cut strip of the Kerdi material.)
It helped to have two trowels or a putty knife so you can hold the membrane in the corner with one trowel while you smooth out the other side with the other one. It's important to have tight square corners so that your tile will fit together correctly.
Once all the corners are done I installed larger pieces of Kerdi on the walls that overlap the corner pieces. Smooth them out to make sure there aren't any air bubbles underneath. Schluter also makes special corner pieces that a pre-formed to fit into corners and over the curb corners.
INSTALL THE KERDI DRAINThe walls are done- let's do the floor. I covered the floor with a layer of mortar and then pressed the Kerdi Drain into place. The flange has openings that will help it firmly integrate into the mortar. I spread a little more mortar around the flange and installed the Kerdi membrane, making sure to fully embed it, especially around the drain.
That's it! Let it set overnight and we'll be ready to install the tile.
-Peter
www.CarpentryGuy.com