Thursday, April 30, 2009
Subway Tile Ready for Grout
I started today by removing the straight edge supports from the second row that I tiled yesterday. This supported the tile and kept them level until the morter could set up.
This is a second story bath and I had the wet saw set up outside on the back porch. It was a hike everytime I needed a cut. Before mixing the thinset this morning, I went ahead and cut all the tiles that I could.
First, I went around the top edge of the tub and dry-laid those pieces. While the tub is nearly perfectly level, there is some difference in the width of the tiles from front to back. I actually marked all these pieces and numbered them so I'd know where they went. This way, I could make one trip down to the saw and do them all a once. It worked great.
The sides of the surround alternated between a full piece and a half piece (3") of tile. Knowing this, I went ahead and cut all these 3" pieces beforehand as well.
Mostly, today was more of the same as yesterday. However, when laying the first row I got the spacing right and then stuck a piece of tape on it to hold it there. You can see this in the picture as well as my numbers telling me which tile is next.
I was hoping to start the floor, but I'm not quite there yet!
-Peter
www.CarpentryGuy.com
Wednesday, April 29, 2009
Subway Tile Surround Day 1
Tuesday, April 28, 2009
Prepping for Tile Surround
Tile needs a very solid surface to support it to keep it from moving and forming cracks in the grout. For a bath surround, some type of cement board is recommended because it's much more resistant to water and mold. For this surround I used 1/2" Hardipanel from James Hardie.
Before installing the cement board, make sure your framing is as level and straight as possible. Then, install a moisture barrier of 4 mil plastic. I just stapled it to the studs, making sure that it went over the lip of the tub and that the corners were not bunched up.
Now, time for the Hardipanels. These commonly come in 3' x 5' sheets. I planned my tile surround to extend 5' high so I used the sheets vertically. This worked well because the ceiling in this bath is lower. You can use two sheets horizontally if you do a 6' high surround.
I cut the sheets by scoring and snapping them. They are much more difficult to score than drywall, so pick up a carbide-tipped scoring knife made especially for cement board. Don't use power tools on it if possible because you'll soon have a dust cloud of harmful silica.
Of course, wear your respirator for this. (Not your flimsy dust mask. Get the good one for this project!)
The cement board was attached with special 1 1/4" corrosion-resistant screws designed (or at least marketed) for this purpose. I covered the joints with 2" mesh tape that will get sealed with thin-set tomorrow.
Those are the basics. Soon we'll be tiling!
-Peter
www.CarpentryGuy.com
Monday, April 27, 2009
Installing A Bathroom Exhaust Fan
Thursday, April 23, 2009
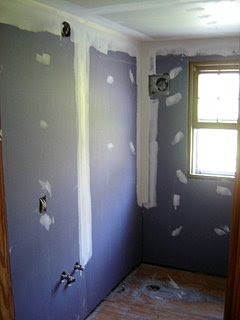
Purple is the New Green
Wednesday, April 22, 2009
Tub Installation Success!
Tuesday, April 21, 2009
P-Trap Ramblings
I figured that a quick Google search would yield the answer but I was left disappointed. After some deeper searching, I still cannot figure it out.
The closest explanation that I found was this page at "VictorianCrapper.com" that has a nice history of the toilet, for those of you that are interested... On it, they talk about how the trap keeps out "putrification" odors. This word isn't used much anymore, but it's related to 'putrid', a.k.a. really terrible smells.
At least this makes sense, given that the function of a P-trap is to always have a little water in it so that sewer gases from the drain lines don't get into your home. It's a nice feature that you'd really miss if it wasn't there.
If you know the answer to this, please let me know so I can get some sleep!
If you read this post you must be bored, really curious, or related to me...
:)
-Peter
www.CarpentryGuy.com
Ready for a Tub!
You can see where the galvanized supply lines ended at the old shower. I made the transition to PEX with some Shark-Bite connectors and had to cross the lines to keep the hot on the left side. I got everything hooked up and was thankful to not even have one drippy connection! That's a good day, right!?
The drain from the old shower stall had to be moved as well. This didn't prove to be too difficult. The last plumbers had completely removed the floor joist so I had plenty of room to work with.
I'm a little concerned about the floor being strong enough for a tub full of water with this joist missing, so I'll add some extra bracing tomorrow before I set the tub in place. It will also get two layers of 3/4" plywood to build it up to match the rest of the subfloor.
I made the drain transition from 2" galvanized to 2" PVC with a rubber sleve. I used a p-trap that has a compression joint in the center. This type of joint screws together with a big nut, rather than being joined with cement. This will make it easier to install from underneath, and also allow it to be removed, should it get clogged someday.
I'm soooo ready to do drywall, but alas the tub is next!
-Peter
www.CarpentryGuy.com
Monday, April 20, 2009
Demolition Day for Bathroom Remodel
Sunday, April 19, 2009
Drywall Scaffold Comes in Handy
Saturday, April 18, 2009
Painting Cabinets with an Airless Paint Sprayer
After a little digging, I had a friend tell me about some decent cabinets that they had purchased from Southeastern Salvage. The cabinets were made out of plywood with oak fronts and came unfinished in many standard sizes. This was perfect for our purposes and kept us within our budget.
I've given them a coat of dark brown paint and they look great. To paint them, I borrowed an airless paint sprayer. (Airless just means that it uses electric power rather than compressed air.) The sprayer was the Wagner Wide Shot Pro 2400.
I started by painted some vanity drawers and had no problems. I cleaned the gun and took a break to get the kitchen cabinets ready. Later, as I started painting the cabinet doors, the sprayer started 'spitting' large globs of paint. This was not cool! I cleaned it several times, and replaced the 'atomizer' in the nozzle and it still wouldn't work.
That was yesterday, this morning I finally got it to work. Here's the secret:
1. Thin the paint. I had been advised that this paint wouldn't need to be thinned, but they were incorrect. For the Behr latex paint I was using, I added around 6 ounces of water and 6 ounces of Flo-trol to a nearly full gallon of paint. You may want to start by adding less and increase the amount as needed to get an even spray.
2. Watch how you hold the sprayer. My biggest problems came when I was painting cabinet doors that were laying flat on some saw horses. When I pointed the spray gun down toward them, it was sucking air instead of getting the paint from the reservoir. It's really best to just aim the gun straight ahead and position the item to be painted so that this will work.
3. Clean the gun really well after each use. To clean the paint sprayer, you have to take the pieces apart and clean them individually. After taking the nozzle off, don't forget that the next piece comes off as well to reveal the piston inside. All of this should be cleaned up so that no paint can dry and become a nuisance for you. After you've done that, run some clean water through the gun to make sure the nozzles and all the parts are free
For jobs like painting cabinets, fences, louvered doors and more, you might consider trying out a paint sprayer. This Wagner model has some good and bad reviews online, but it worked great for me, once I got it setup right and thinned my paint. It takes a few minutes to clean and can have some hassles, but it will greatly cut down on how long it takes to paint these tricky items.
-Peter
www.CarpentryGuy.com
Thursday, April 16, 2009
Patching A Small Hole in Drywall
First, I find a scrap of wood, or make one, that will cover the hole plus a couple inches. The wood will support the drywall patch. This is important. If you just put some mesh tape over a hole like this and mud it until it's covered, you'll soon have cracks again, because it needs support.
To get the wood in place, drill a drywall screw partway into the middle of it. This screw will give you a 'handle' so you can hold the wood while you screw the drywall to the ends. (Otherwise, you'll drop it into the wall cavity!)
After a couple of screws are holding the wood in place, you can remove the center screw and insert a peice of drywall cut to match the hole.
Then, you just tape and mud the joint like any others. For larger holes you'll need more wood to support it fully.
TIP: Don't apply too much pressure when screwing the drywall down. If you do, you're likely to bust through the drywall and make things worse.
-Peter
www.CarpentryGuy.com
Wednesday, April 15, 2009
Adding a Simple Recessed Light
I like to use a 5" recessed fixture. They sell one at Home Depot for under $10 and that includes the trim, can, and everything you need to install it. Plus, it will work with an ordinary 60-watt bulb. They're very compact and can be installed in a drywall ceiling without tearing out extra drywall that will need to be patched.
Sometimes the hardest part is deciding where to put them. It's always good to try for symmetrical placement centered along doorways or windows, etc. Aside from that, you want to figure out where the ceiling joists are and try to center the light between them.
With that decided, mark the locations. The manufacturer provides a template to trace around so that you can cut a hole that is the exact size needed. Try not to make it any larger than the paper template. I usually start the hole with a spade bit and then finish it with a jig saw. Try not to cut very deep to stay away from any hidden wires or pipes. (Think before you cut... :)
One way or another you'll need to get a wire through the ceiling and to the hole. This is simple if you have an attic. In our case, we were only two joists from a larger hole so we bought a long drill bit with an extension that made it around 20" long. We drilled the hole and were able to fish the wire to where the lights would be.
All the wiring happens in a small box on top of the light can. First, punch out the metal tab and put in a 3/8" Romex connector. (This is a metal clamp that will keep the wire from moving from it's position.) The wire goes through this connector then you can tighten it down.
The connections are just like any basic light fixture. The wires all fit in the small metal box which is screwed down and attached to the top.
Now, you can put the metal "feet" on the can that will slide out once it's in the ceiling and press against the drywall. Small metal tabs attach the the front lip of the can. These will keep the edge flush with the drywall and form a "sandwhich" with the feet making it stay in place. The trim is attached by hooking the springs in the can.
Add a bulb and you're done. It's cheap and easy and very effective when you want to add some light to a room.
-Peter
www.CarpentryGuy.com
Monday, April 13, 2009
Finding House Parts in Nashville
Here are some suggestions:
Habitat For Humanity Home Store, 1001 8th Ave South
Habitat runs two stores that are only blocks from each other. Both stores have new/used items that were donated to be sold so they can raise money to build more Habitat Homes. This store, on South 8th has home/office furnishings like filing cabinets, light fixtures, textiles, mirrors and more.
Habitat For Humanity Home Store, 908 Division Street
This store is packed with hundreds of old doors, windows and all kinds of building materials. You can also find kitchen cabinets, bathroom fixtures, paint, flooring and more. The best stuff goes quickly, so you might need to come back often to see what you can find. They post some of their items online so click here to see what I’m talking about.
Hailey’s Salvage & Building Material, 1224 Dickerson Pike
Tons of building materials salvaged from demolitions and renovations. Find clawfoot tubs, vintage sinks, ornate mantles and fireplace surrounds. Might be a great source for items for your rental property. Free tip: Bring the pickup when you go.
Preservation Station, 1809 8th Ave South
After you buy doors at the Habitat Home Store, this is the place to go to buy your antique hinges and doorknobs. They also carry a variety of old doors and light fixtures. This is not a discount store. They carry architectural antiques, which means they are pricey and rare. When you’re looking for that perfect chandelier for your 1905 Victorian home, this is the place to start. They also buy items if you have any antique house parts to get rid of.
Okay, that’s my list. Be careful, though. It’s very easy to find something at these stores that you love, but you don’t really have a place for. You may end up renovating your home just to have a place to put it…
-Peter
www.CarpentryGuy.com
Sunday, April 12, 2009
Cover the Ugly Ducts with Soffits
Our home had survived 40+ years with out central air conditioning, but this changed after we bought it a couple years ago. It was a bit tricky to add a new HVAC system to our 60's split-level because there weren't many hidden places to run the new ducts. Instead, it had to go along the ceiling, waiting for me to deal with later.
So, with our current apartment conversion it is time to build soffitts to cover all the ducts and make it look as pretty as possible. Here's a picture showing the ducts and framing we've done in the bathroom: You can also see in the picture where we made the closet a little deeper to accomodate the stacked washer/dryer (more on that here).
NOTE: There are a couple different kinds of soffitts. Often this term describes the underside of an eave, or the roof overhang- you may have heard of a soffitt vent which is installed in an eave soffitt to help air flow in the attic. In our case, the soffitt is a framed box that will hide ductwork. They are quite common especially in finished basements where plumbing or ducts are unsightly.
Saturday, April 11, 2009
Plumbing to Add A Washer & Dryer
Typically, you'll be joining your supply lines to existing pipes somewhere under the house. You might consider adding some valves when you do this. Valves are always quite handy, especially in older homes where there are none to be found!
TIP: Take out a Sharpie-type marker and label your PEX "hot" or "cold" with arrows so that you (and others) will know what's going through each pipe. It may be extremely helpful later.
Thursday, April 9, 2009
Camera Phone is Handy When Wiring
Check Out the IKEA Kitchen Designer.
To use their planning software you have to first download it from their website here. Once you have it on your computer, you can start a new design by inputting the dimensions of the room. Then, you can start filling the room with nearly any of IKEA's kitchen products.
Of course, the drawback is that it will only use items that are sold by IKEA, but I was able to use stock sizes to put together a quick rendering of what our kitchen will look like. After you've selected the items in the 2D "Furnish" view which gives you an overhead look at the room, you can hit "3D View" to see the image of how your kitchen will look.
The photo above is about what it will look like when we're finished. Pretty simple, right? -And, it's all free.
-Peter
BTW- I just noticed that they also have planning software for other rooms, which means all of your free time just disappeared...
www.CarpentryGuy.com
Wednesday, April 8, 2009
Making an Easy Notch When Framing
Monday, April 6, 2009
Apartment Conversion Has Begun
Sunday, April 5, 2009
Drywall Lift Makes Ceilings a Cinch!
Saturday, April 4, 2009
Hide the Ugly Electrical Panel Part 2
Friday, April 3, 2009
Asphalt Roll Roofing for Your Flat Roof
This might be a good time to mention that I'm NOT a roofer. However, I sometimes do roof repairs. I'm hardly an expert on this subject. I found several places online that describe the four main types of flat roofing. The most economical and easy to install is the asphalt roll roofing. Because it was cheap and easy, this was the type of roofing I installed today.
After removing the shingles that had 'doomed this roof to leakiness', I ended up replacing all of the plywood sheathing across the bottom edge. It was all completely rotted and soft. With nearly 4 new sheets of 5/8" sheathing in place, I was ready to clean off the remaining nails and put down 15 lb underlayment. So far, this is the same as a typical shingle roof.
Now, instead of laying shingles, we use asphalt rolled roofing. Each roll covers around 100 square feet, or 1 square (in roofing lingo) and are heavy.
The installation is quite simple. First, I like to unroll a piece and cut it to the right length. Then, I get it in place and nail it along the top edge where the next piece will overlap by around 2-3 inches. The manufacturer suggests that your nails be 9" apart. Once I know it won't move on me, I gently lift up the bottom edge and spread about a 2" line of roofing mastic.
The roofing mastic I was using was Henry's 202. It's actually made for roll roofing so it should do the trick. I spread it with a cheap (disposable) paint brush. Watch out, because this stuff is extra sticky!
That's about it. When you get to the top you want to make sure to get the last roll roofing tucked all the way under the lowest course of shingles. Then nail the shingles like normal to hold the roll roofing there.
They say that this type of roll roofing should last 10 years. Even still, you'll want to keep an eye on any flat roof. They are notorious for good reason.
-Peter
I still say I'm NOT a roofer! :)
www.CarpentryGuy.com
Thursday, April 2, 2009
Don't Shingle a Flat Roof
It is nearly flat and was covered with felt paper and then 2 layers of asphalt shingles. Even through all of these shingles, water was making its way through and beginning to damage the interior.
At this particular house, the shingles had started to form little valleys where water would be trapped. You can see them in the picture below. Instead of running down the roof, water was seeping into the shingles.
The homeowner was hoping to just fix the corner where the leak was happening. I started to peel off layers of shingles in this area and found lots of moisture beneath. The plywood sheathing was completely saturated with water, with the worst areas completely rotted.
After some discussion we decided to go ahead and re-roof the entire flat part which is over an addition of this East Nashville house. Without re-roofing, these problems are likely to continue to plague this section of the house.
Read about the exciting finish to this project here.
Peter
www.CarpentryGuy.com
Wednesday, April 1, 2009
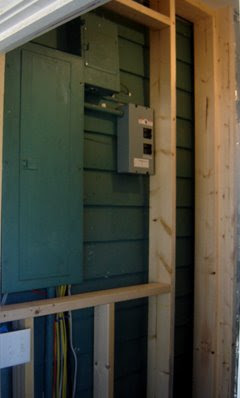
Hide the Ugly Electrical Panel Part 1
They have just renovated their kitchen with all sorts of upgrades, but still had a short hall by the back door that needed some help. This was where the electrical panels were located, but they didn't look very nice and certainly didn't match the rest of the home. My job was to build a wall to cover it all up and install some large doors so the panels can be accessed whenever needed.
I started by framing the ends of the wall and making sure they were level. Thankfully, the new wall was right under a ceiling joist so I secured the top plate to that with no trouble.
With the main wall studs in I went to work making the opening for the doors that I'll install. When finished it will be around 3' wide by 4' tall. I framed the opening with 2x4s making sure it was also level, which will be helpful to make sure the doors fit correctly when I get to that.
Next, I built a soffit for the ductwork that ran up to the second floor and hung the drywall. It was less than 16" wide so I could just place studs on either side and drywall over it.
With the drywall up and the first coat of joint compound finished, it's already 100% better. Just wait until I get those doors on!
-Peter
www.CarpentryGuy.com